Windows Update is one of the parts of Windows 11 that people love to criticize the most. Forced updates and reboots can happen at the worst of times, so the frustration is understandable, but it is an essential component for keeping your machine secure.
That being said, if you don’t want to deal with updates interrupting your workflow, there is a way to avoid it. PowerShell offers you the tools to automate the Windows Update process and make everything far less annoying. If that sounds appealing, we’ll show you how to do it.
All steps involving PowerShell should be run with administrator privileges to ensure they work as intended.
Setting up
To automate Windows updates, all you really need is the latest version of Windows PowerShell, which is already included in modern versions of Windows, and a user account with admin rights. With that, you’ll want to install the PSWindowsUpdate module, which allows for easier update management. This module lets you run multiple commands for managing Windows Updates. But for this guide, we’re focusing on how to automate the process, so it’s relatively easy.
To install this module, simply open PowerShell with admin privileges and enter this command:
Install-Module PSWindowsUpdate
Press Y to accept the prompt that appears to install the NuGet provider (this may not appear if you’ve already got the latest version), and then A to say Yes to all.
Then, you’ll have to import the module with the following command:
Import-Module PSWindowsUpdate
If prompted, press A to always trust this module. You’ll need this so the automation works later.
If this step doesn’t work, you may need to set the execution policy on your PC. Run this command:
Set-ExecutionPolicy Unrestricted
After this try running the import command again and it should work.
Automating Windows Update with PowerShell
Creating the script
Once you have the module above installed, the best option is for you to create a PowerShell script that checks for updates and installs them when they’re available. Thankfully, this has already been done in the past, so you have a couple of options. You can download the PowerShell script from here, or follow the steps below to create it yourself:
- First, create a Folder called Scripts in the root of your C: drive. Then, inside this new folder, create a Logs folder. This will make it easier to see the logs for your script.Alternatively, you can modify the script in Notepad to create logs in another folder that already exists. However, the script can’t write to a directory that’s not already created.
- Open Notepad.
- Copy the block of text on this page and paste it into Notepad.
- Click File > Save As.
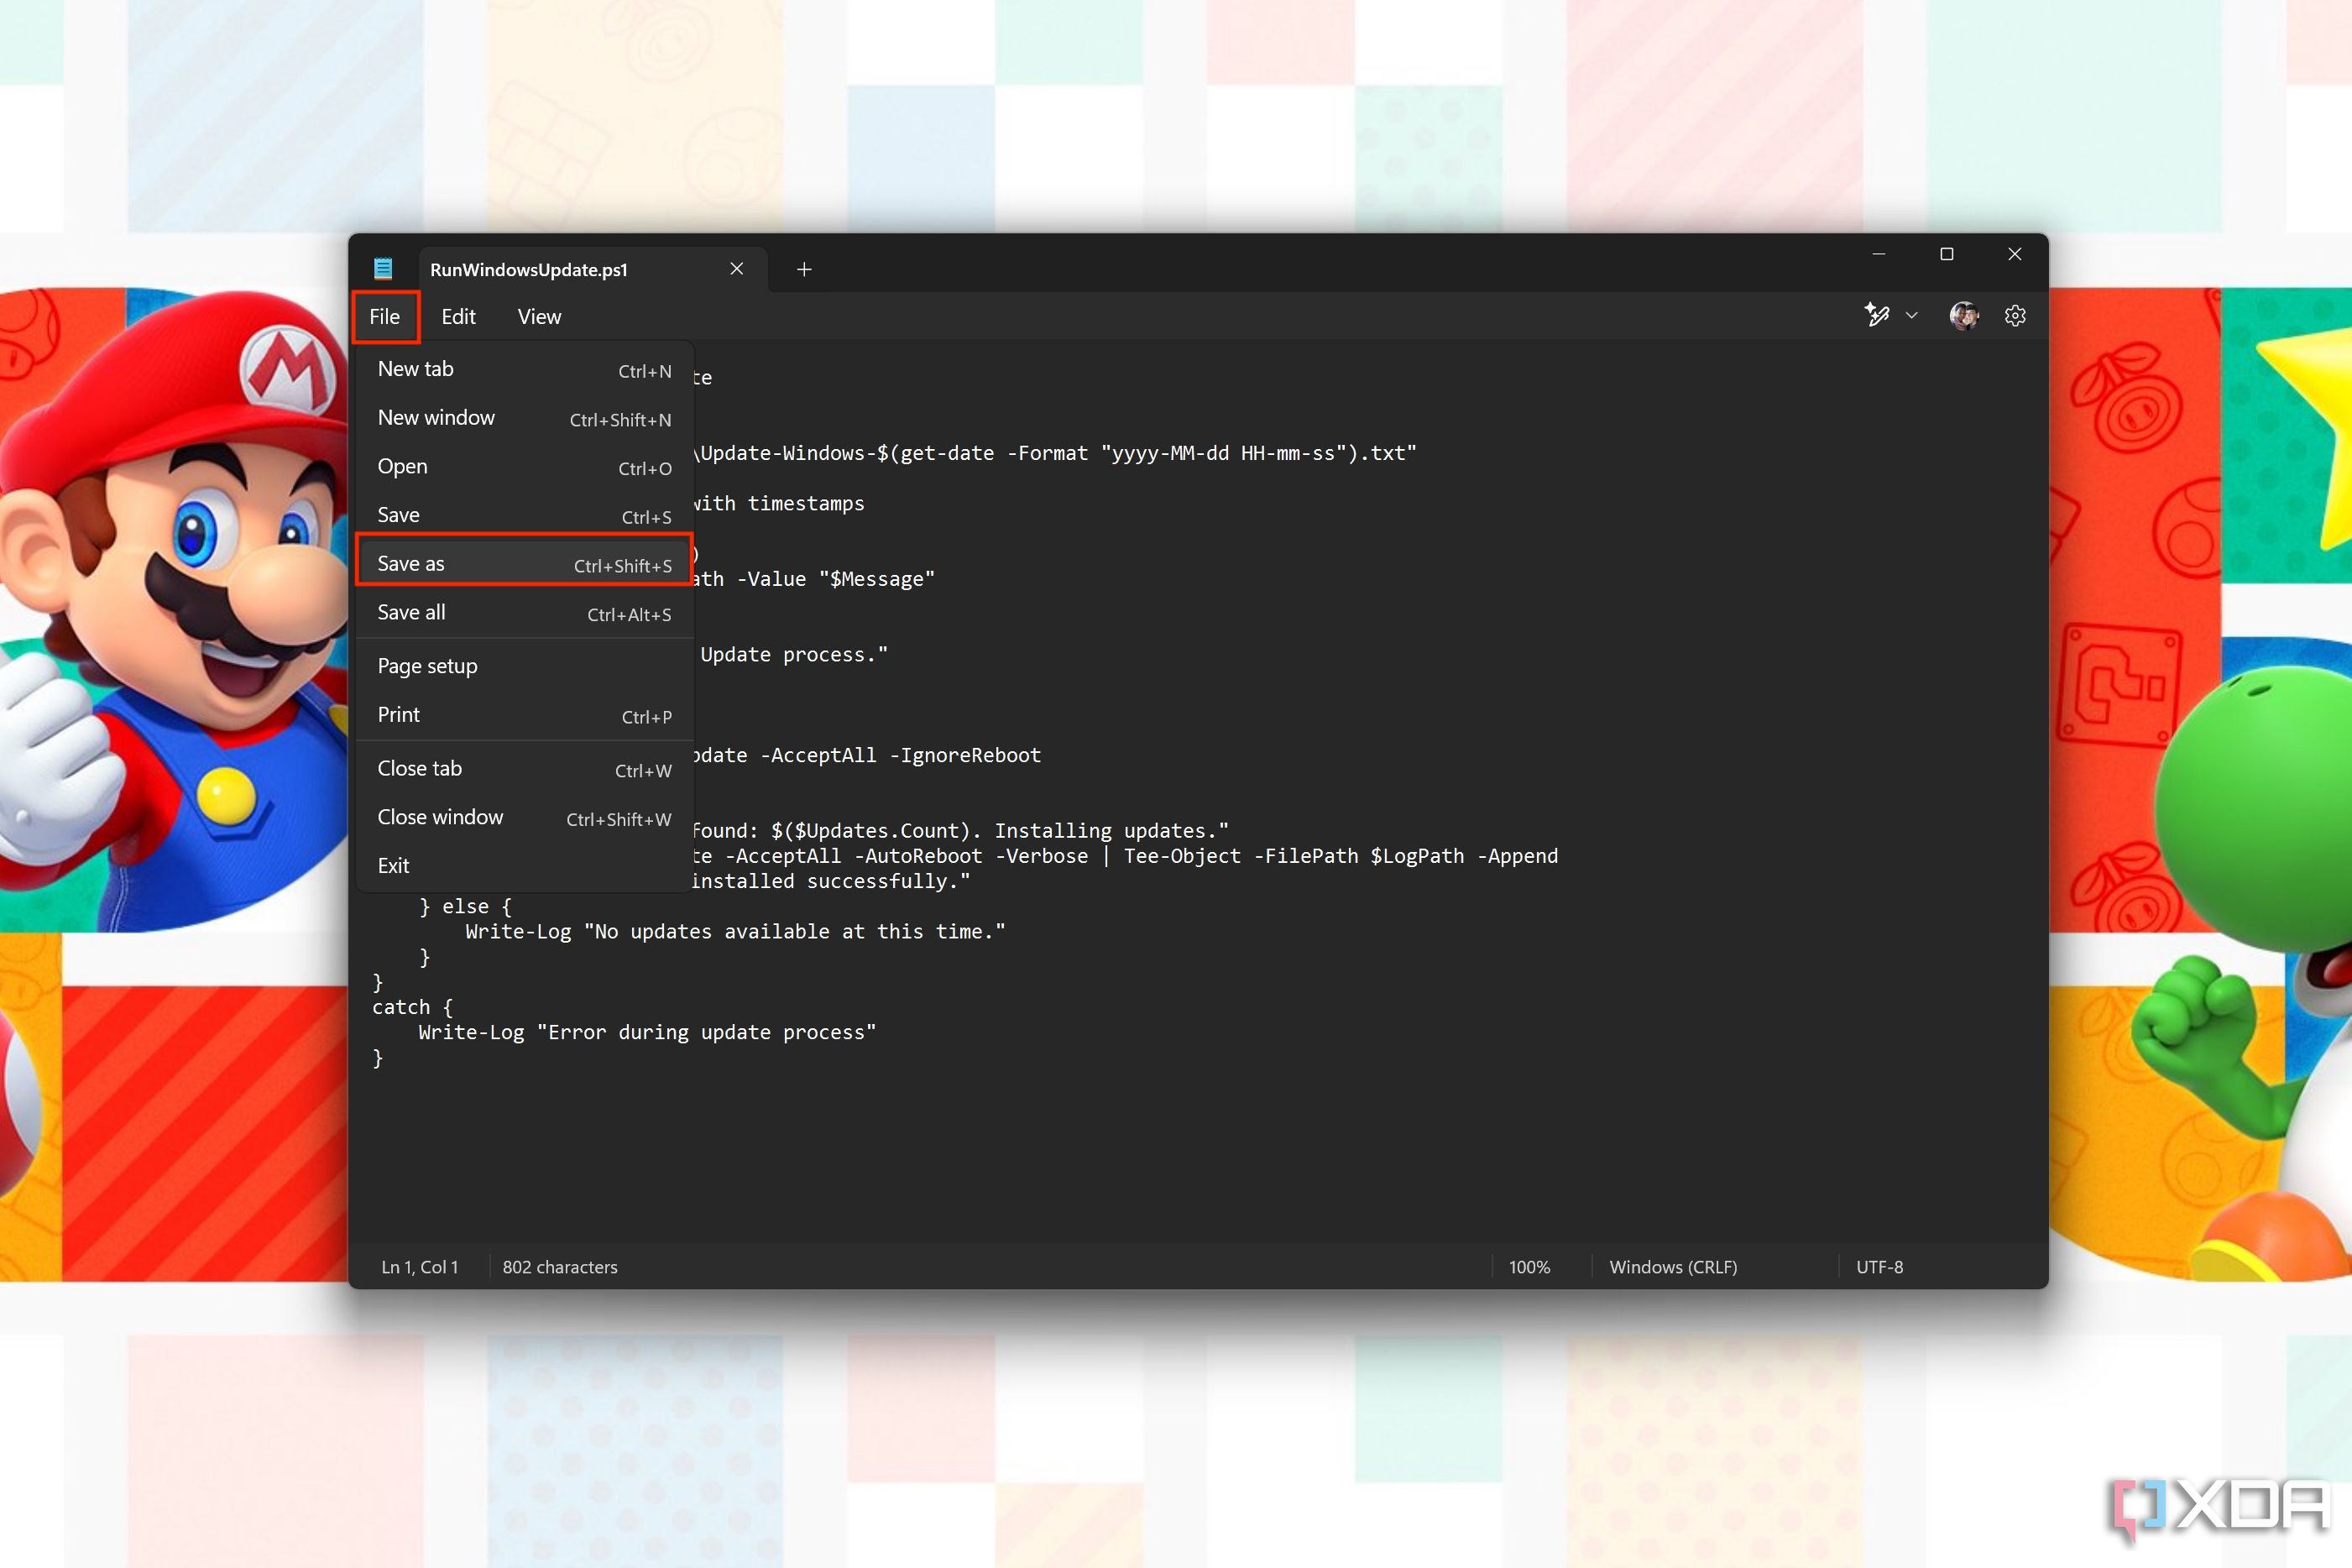
- Navigate to the folder where you want to save the file (as an example, let’s use C:\Users\joaoc\Documents).
- Change the Save as type dropdown menu to All files.
- Choose any name for your file and add .ps1 at the end. For example, RunWindowsUpdate.ps1.

- Click Save.
This script essentially checks for all available Windows Updates, and if any are found, it automatically installs them and also reboots the PC afterward if necessary. That means you want to run this script at a time when you don’t mind the computer rebooting. It also automatically logs any output to a file with the current time and date, making it easy to see the history of updates on your PC.
Automating the script
The next step is making the script run automatically, but before that, we need to ensure that it won’t ask for more permissions. By default, PowerShell scripts are blocked from running automatically, so you have to manually unblock the file. To do this, use the Unblock-File command in PowerShell, followed by the path to the PowerShell script we just created. For example:
Unblock-File "C:\Users\joaoc\Documents\RunWindowsUpdate.ps1"
This will allow the automation script to run unrestricted so you don’t have to approve or do anything manually.
Next, you can create the automation using another PowerShell script to automate the process, or you can use Task Scheduler to do it. We’ll use the latter method as it’s easier to demonstrate.
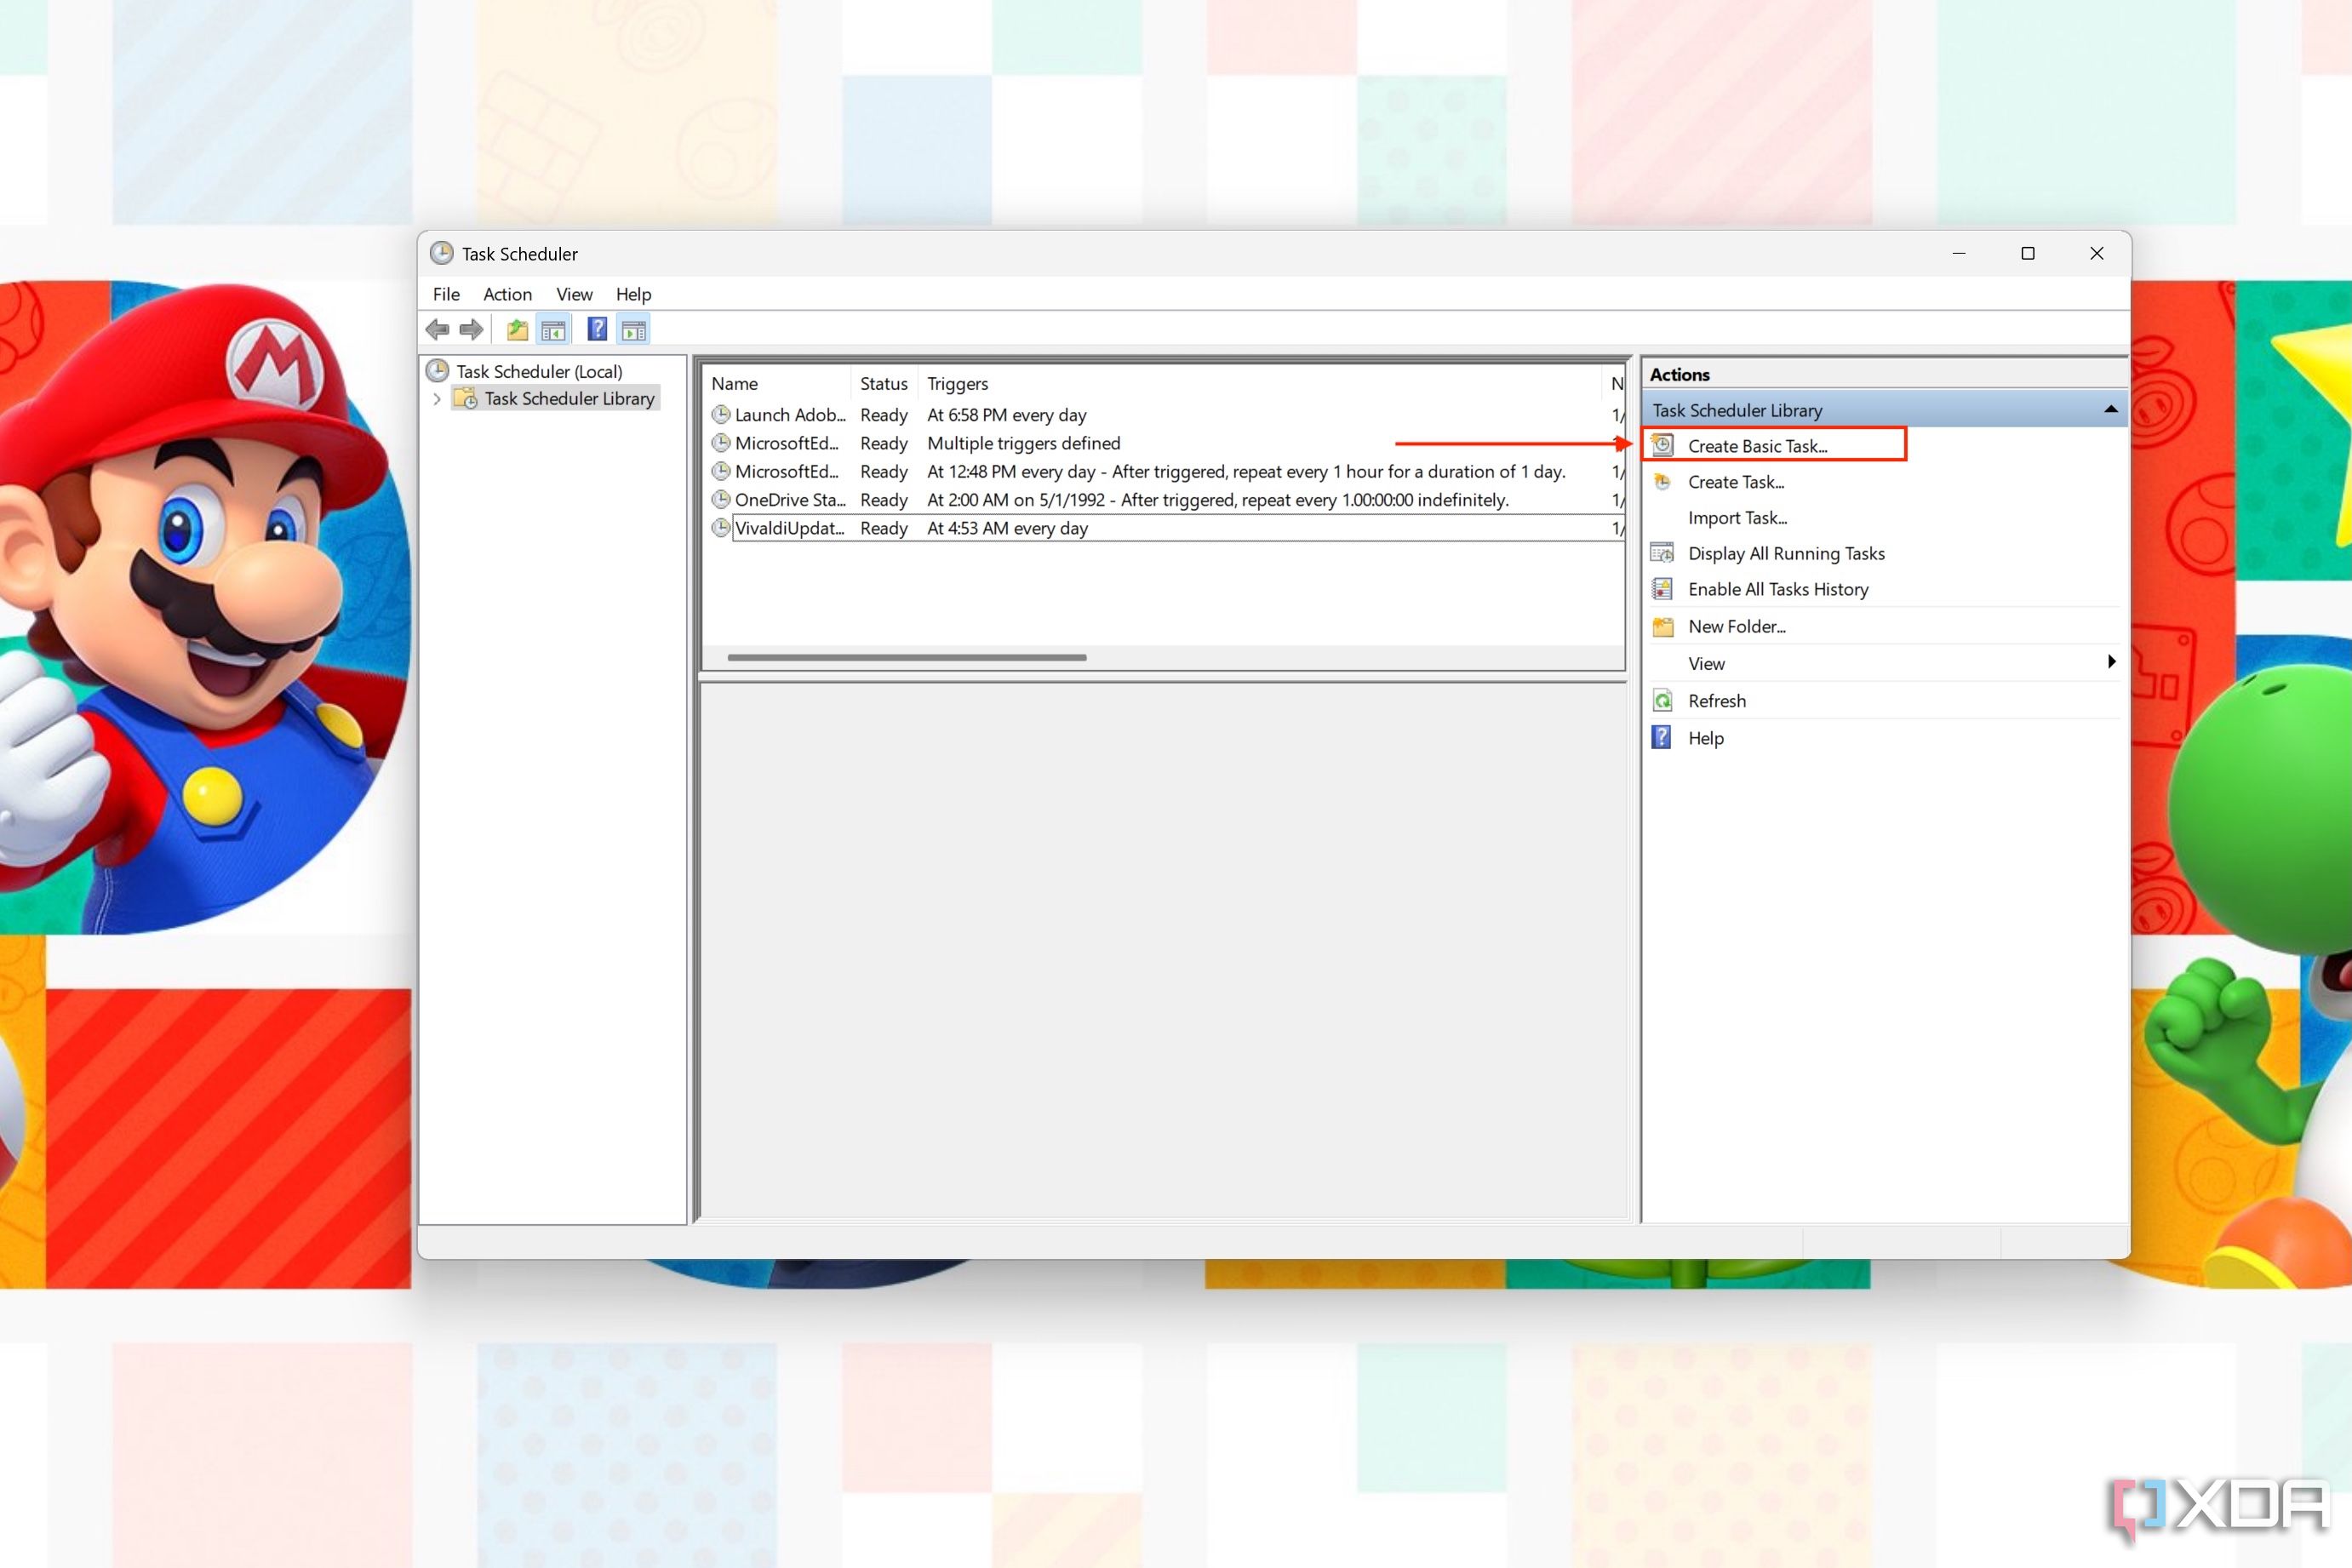
- Open the Start menu and type Task Scheduler into the search bar. Select the first option.
- Use the menu on the right side of the window to select Create Basic Task. (If you want to organize your tasks better, you can create a new folder first).
- Name the task something like Automatic Windows updates (or anything you prefer) and add a description if you prefer. Click Next.
- In the Trigger section, choose how often the script should run. The best option here is likely to set it to Daily so that you can be sure you’ll install any updates before they can bother you. Click Next.
- In the next page, select when the task should run for the first time. Here, make sure you choose a time where you don’t need to use your computer. For example, 3AM would allow the task to run overnight. But you might also have your computer off at that time, so make sure to choose something that works for you.
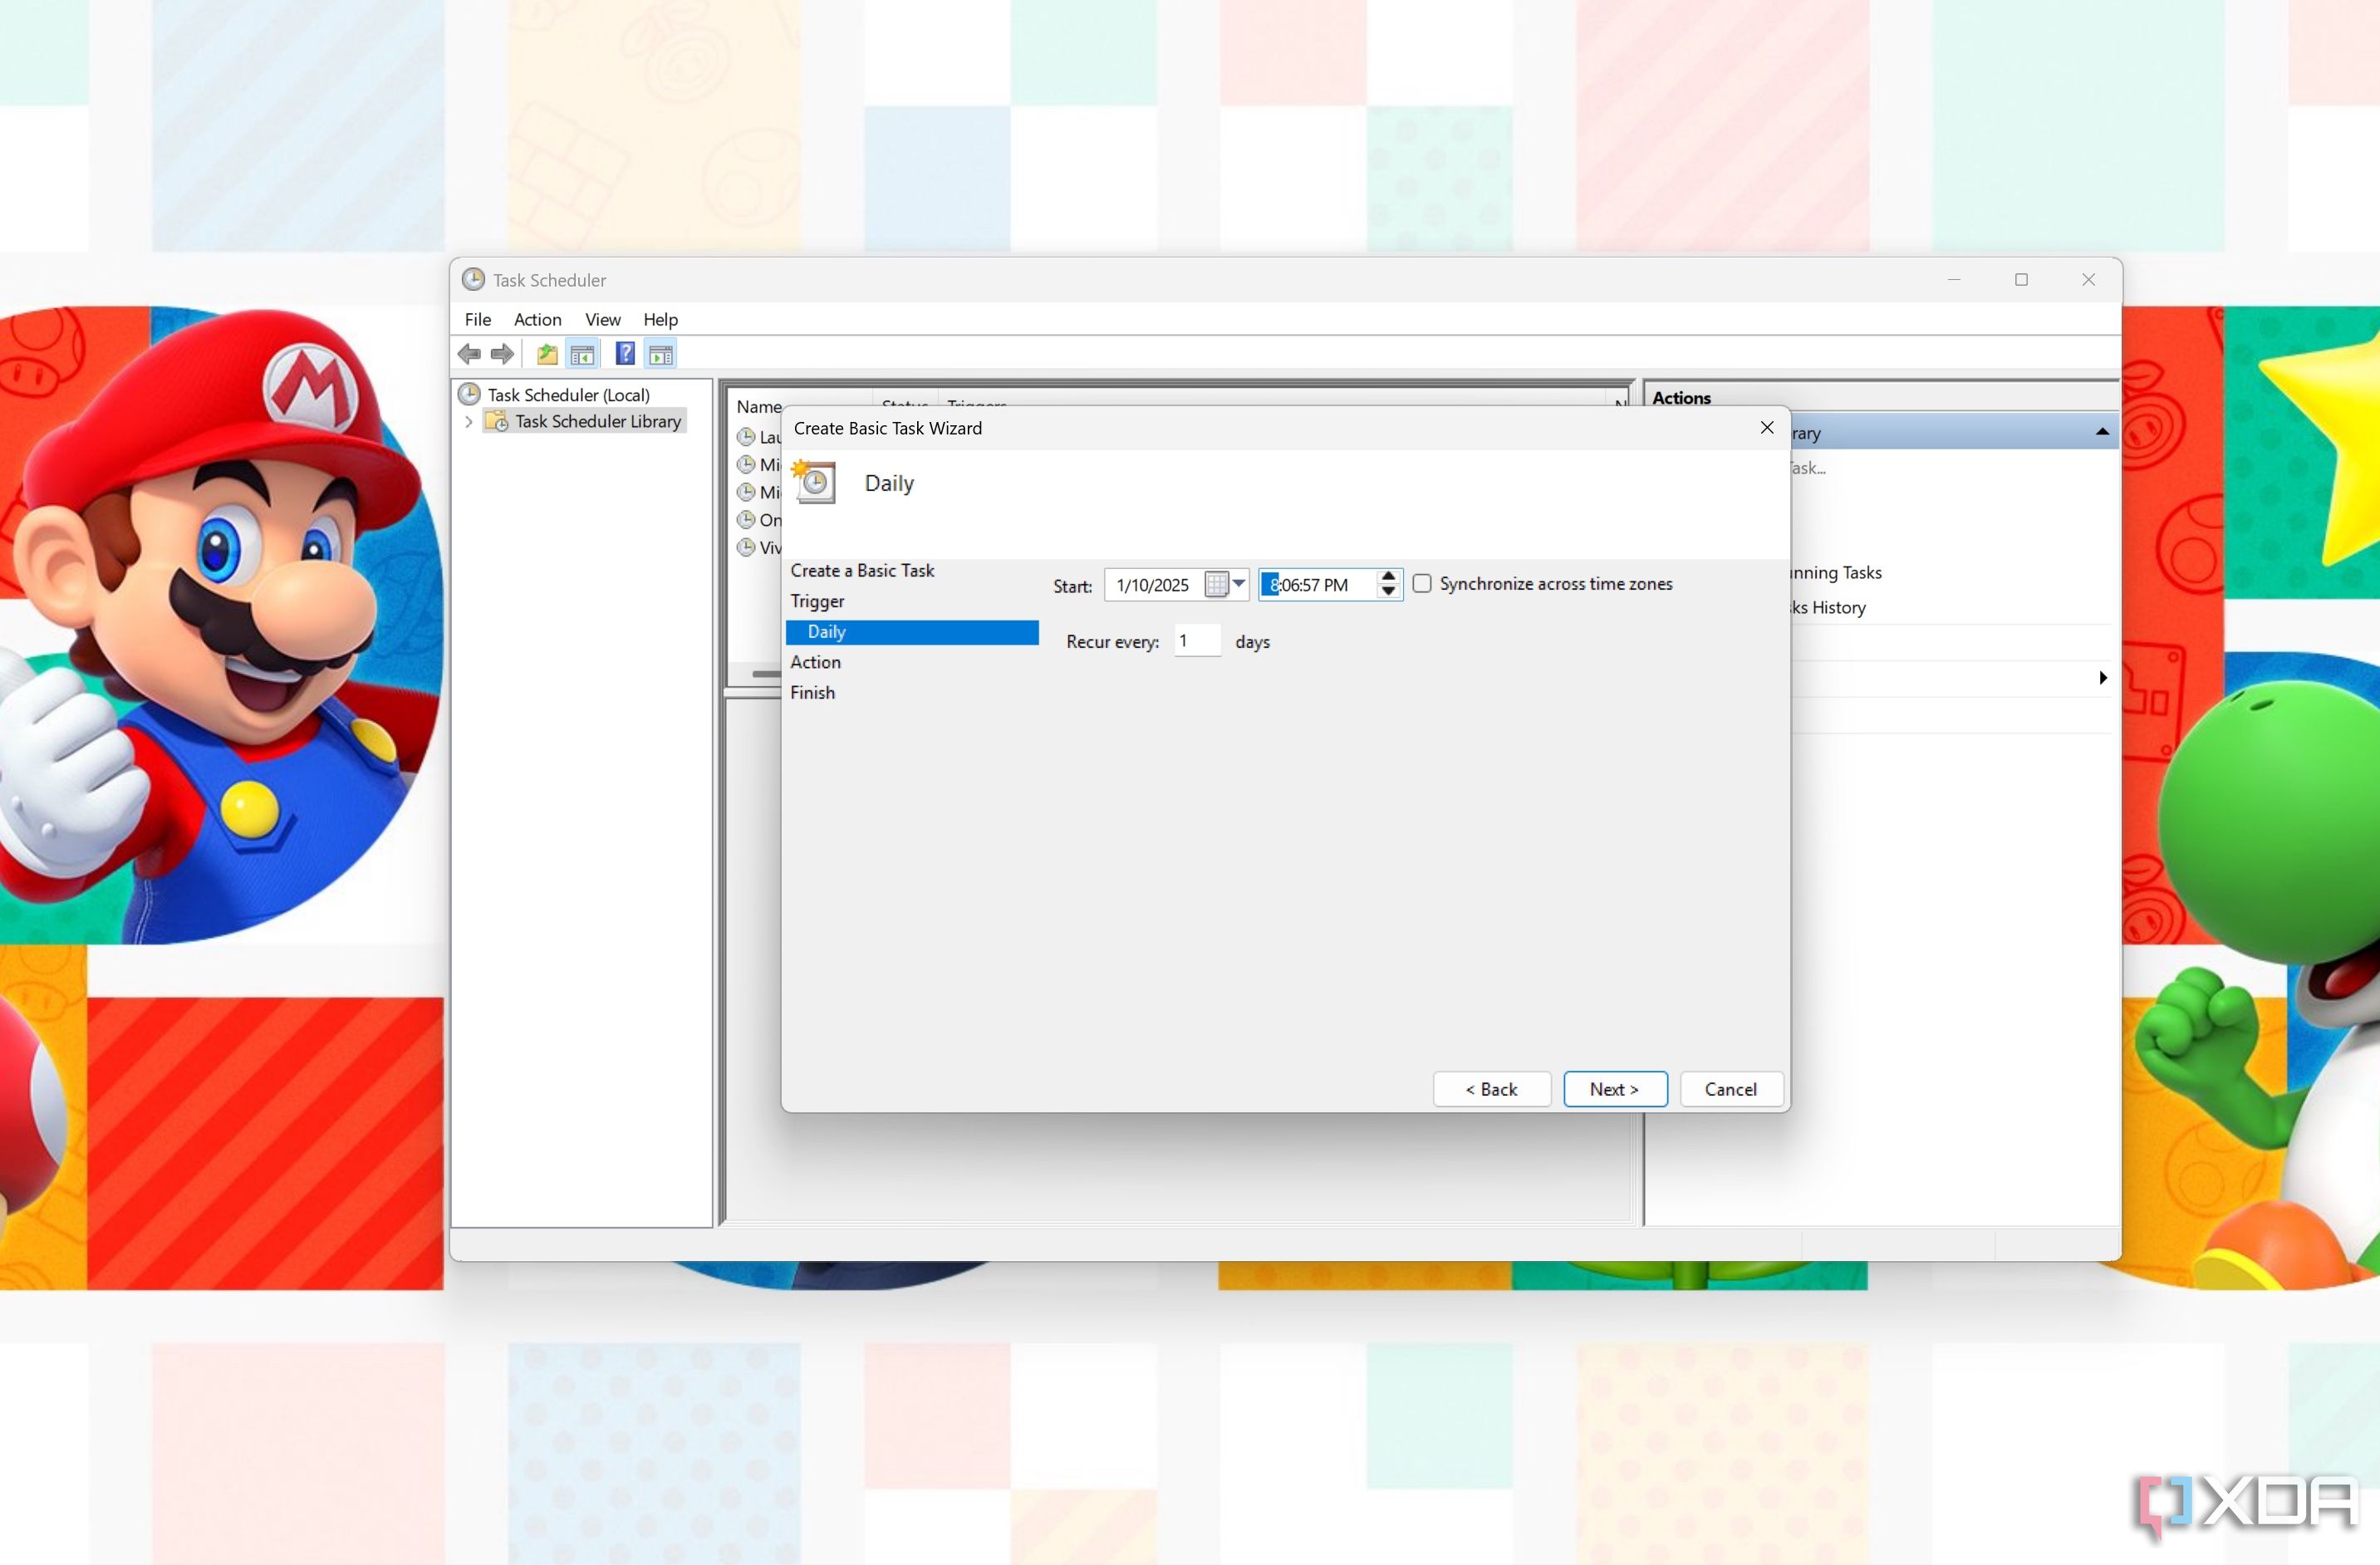 You can also choose how many days should pass between each run. The default is 1. Click Next.
- In the Action tab, choose Start a program and click Next.
- In the next page, under Program/Script, enter PowerShell.exe.
- Next to Add arguments (optional), enter the following (replace the file path with whatever you’re using on your machine):-NoProfile -WindowStyle Hidden -File “C:\Users/joaoc/Documents/RunWindowsUpdate.ps1”
- Click Next and then Finish.
- After creating the task, go to Task Scheduler Library on the left side of the window.
- Right-click the task you created and choose Properties.
- Click Change User or Group….
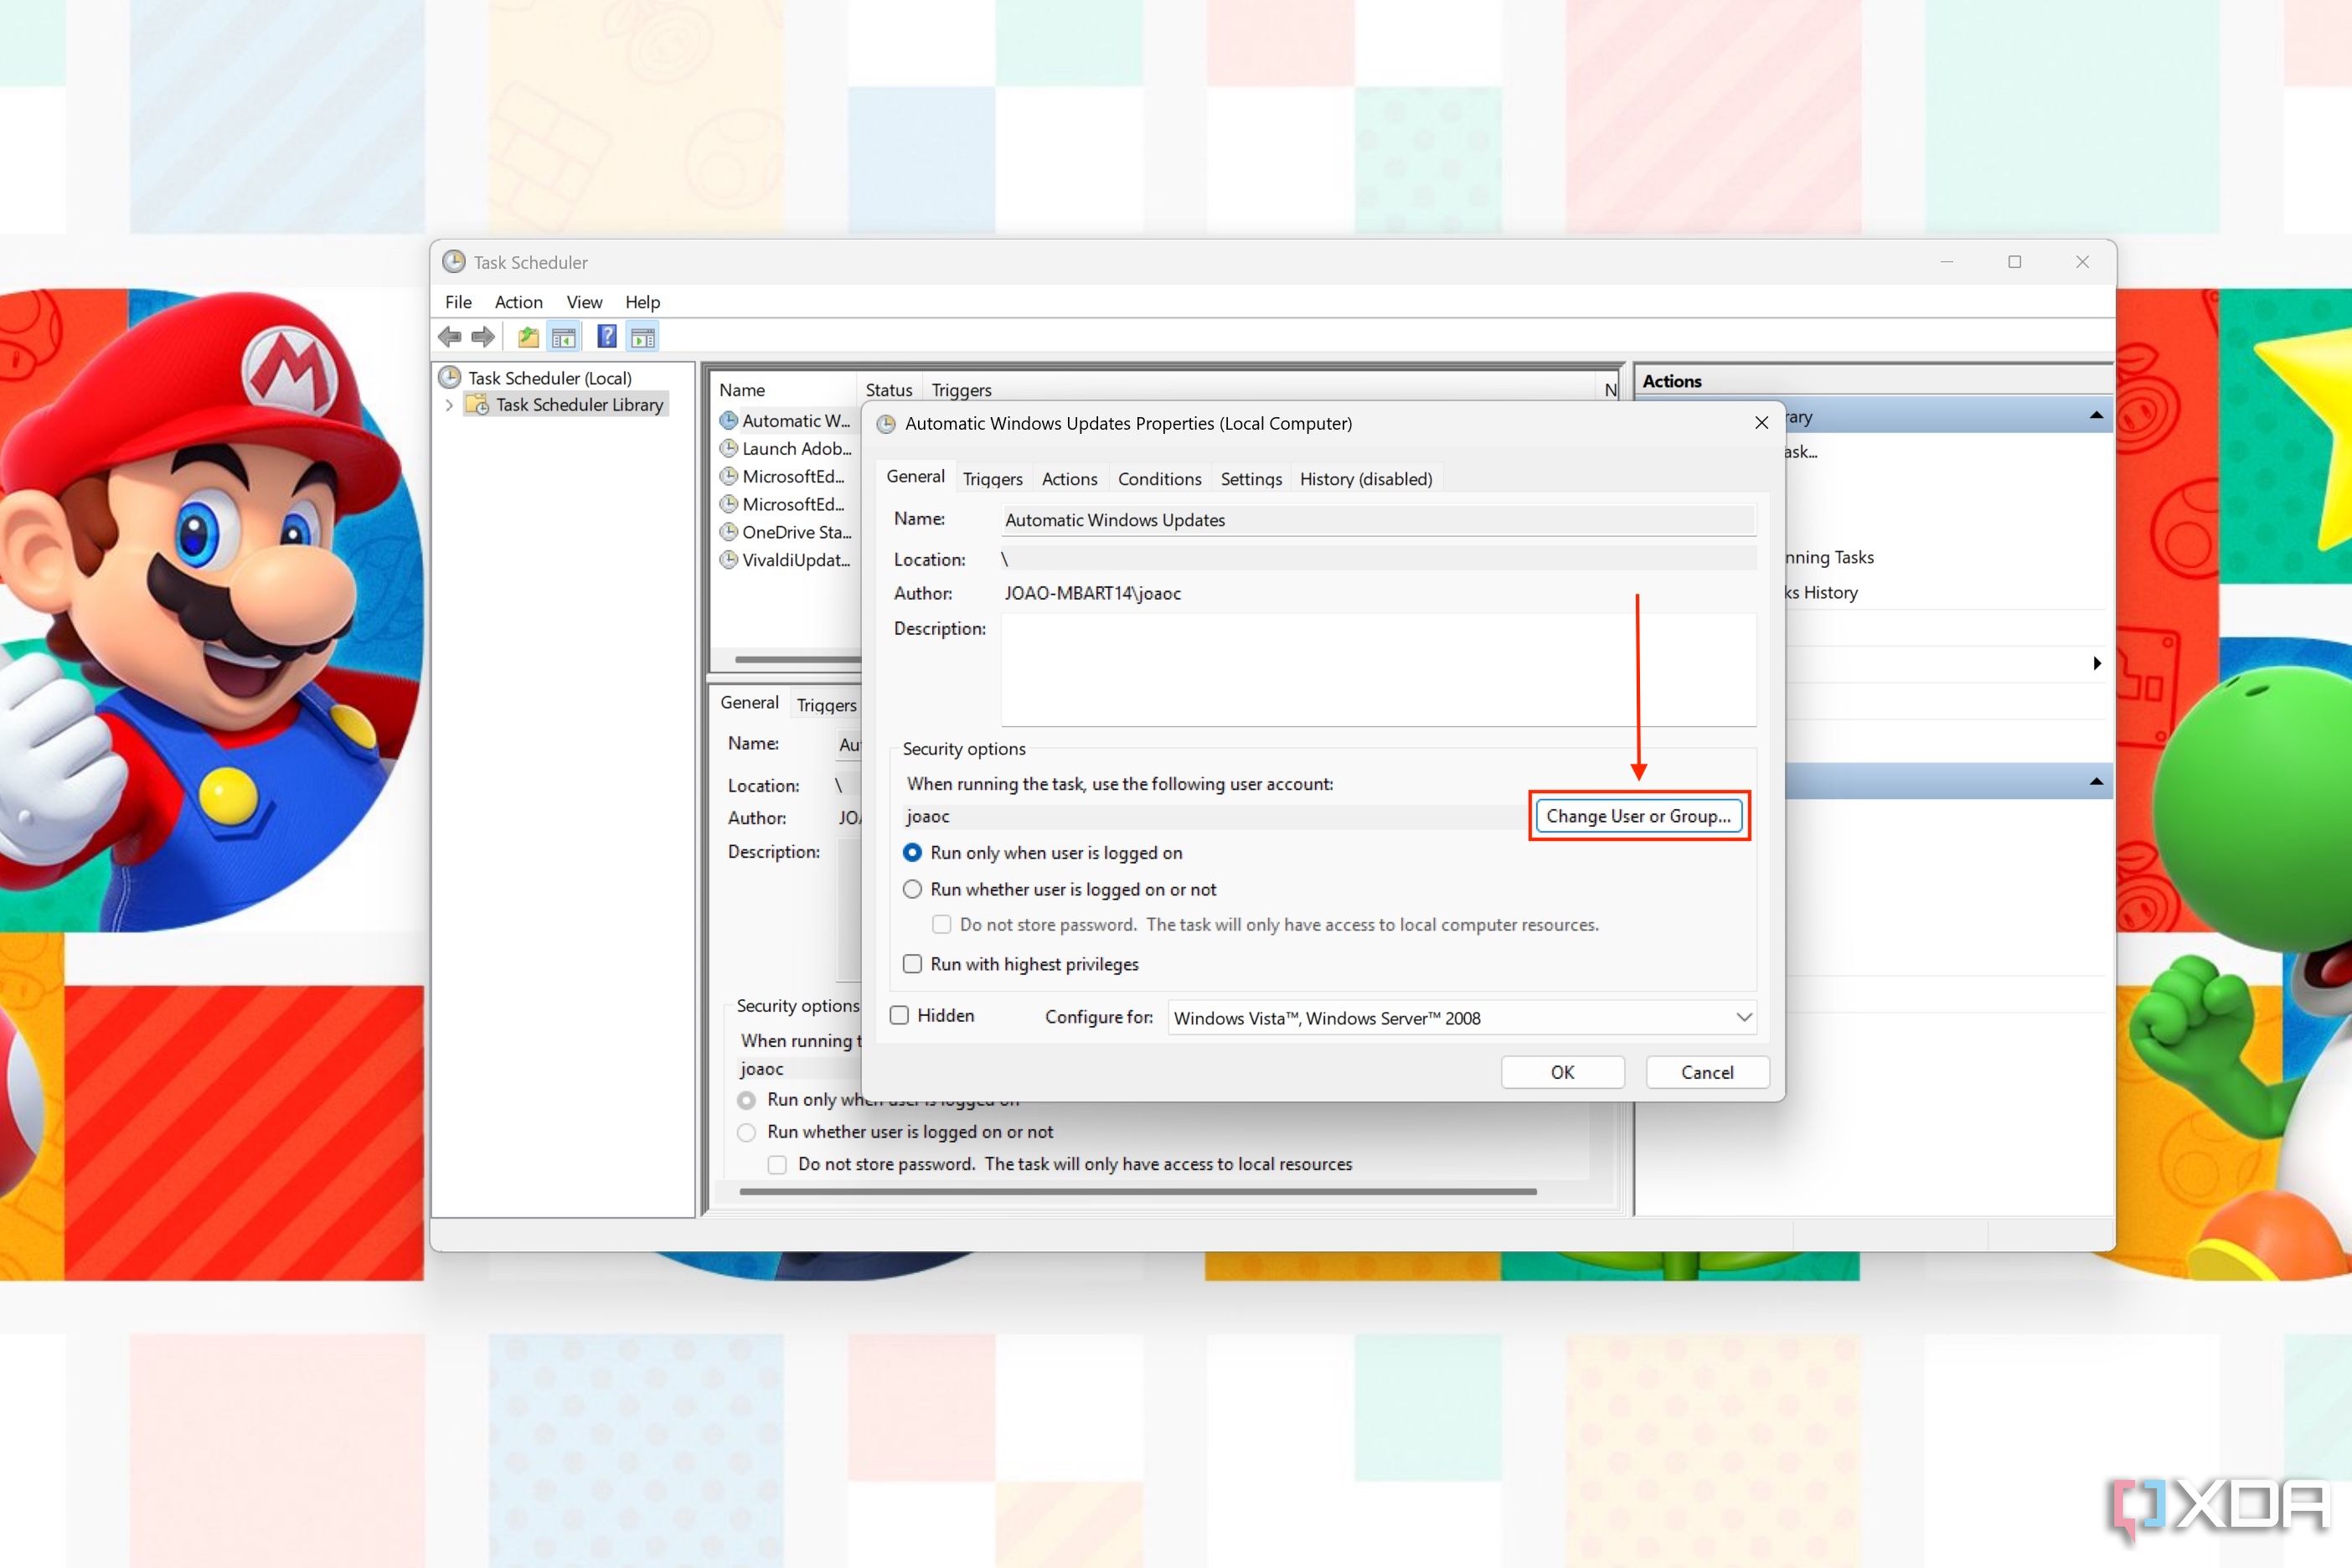
- Type System into the text box and the click Check Names.

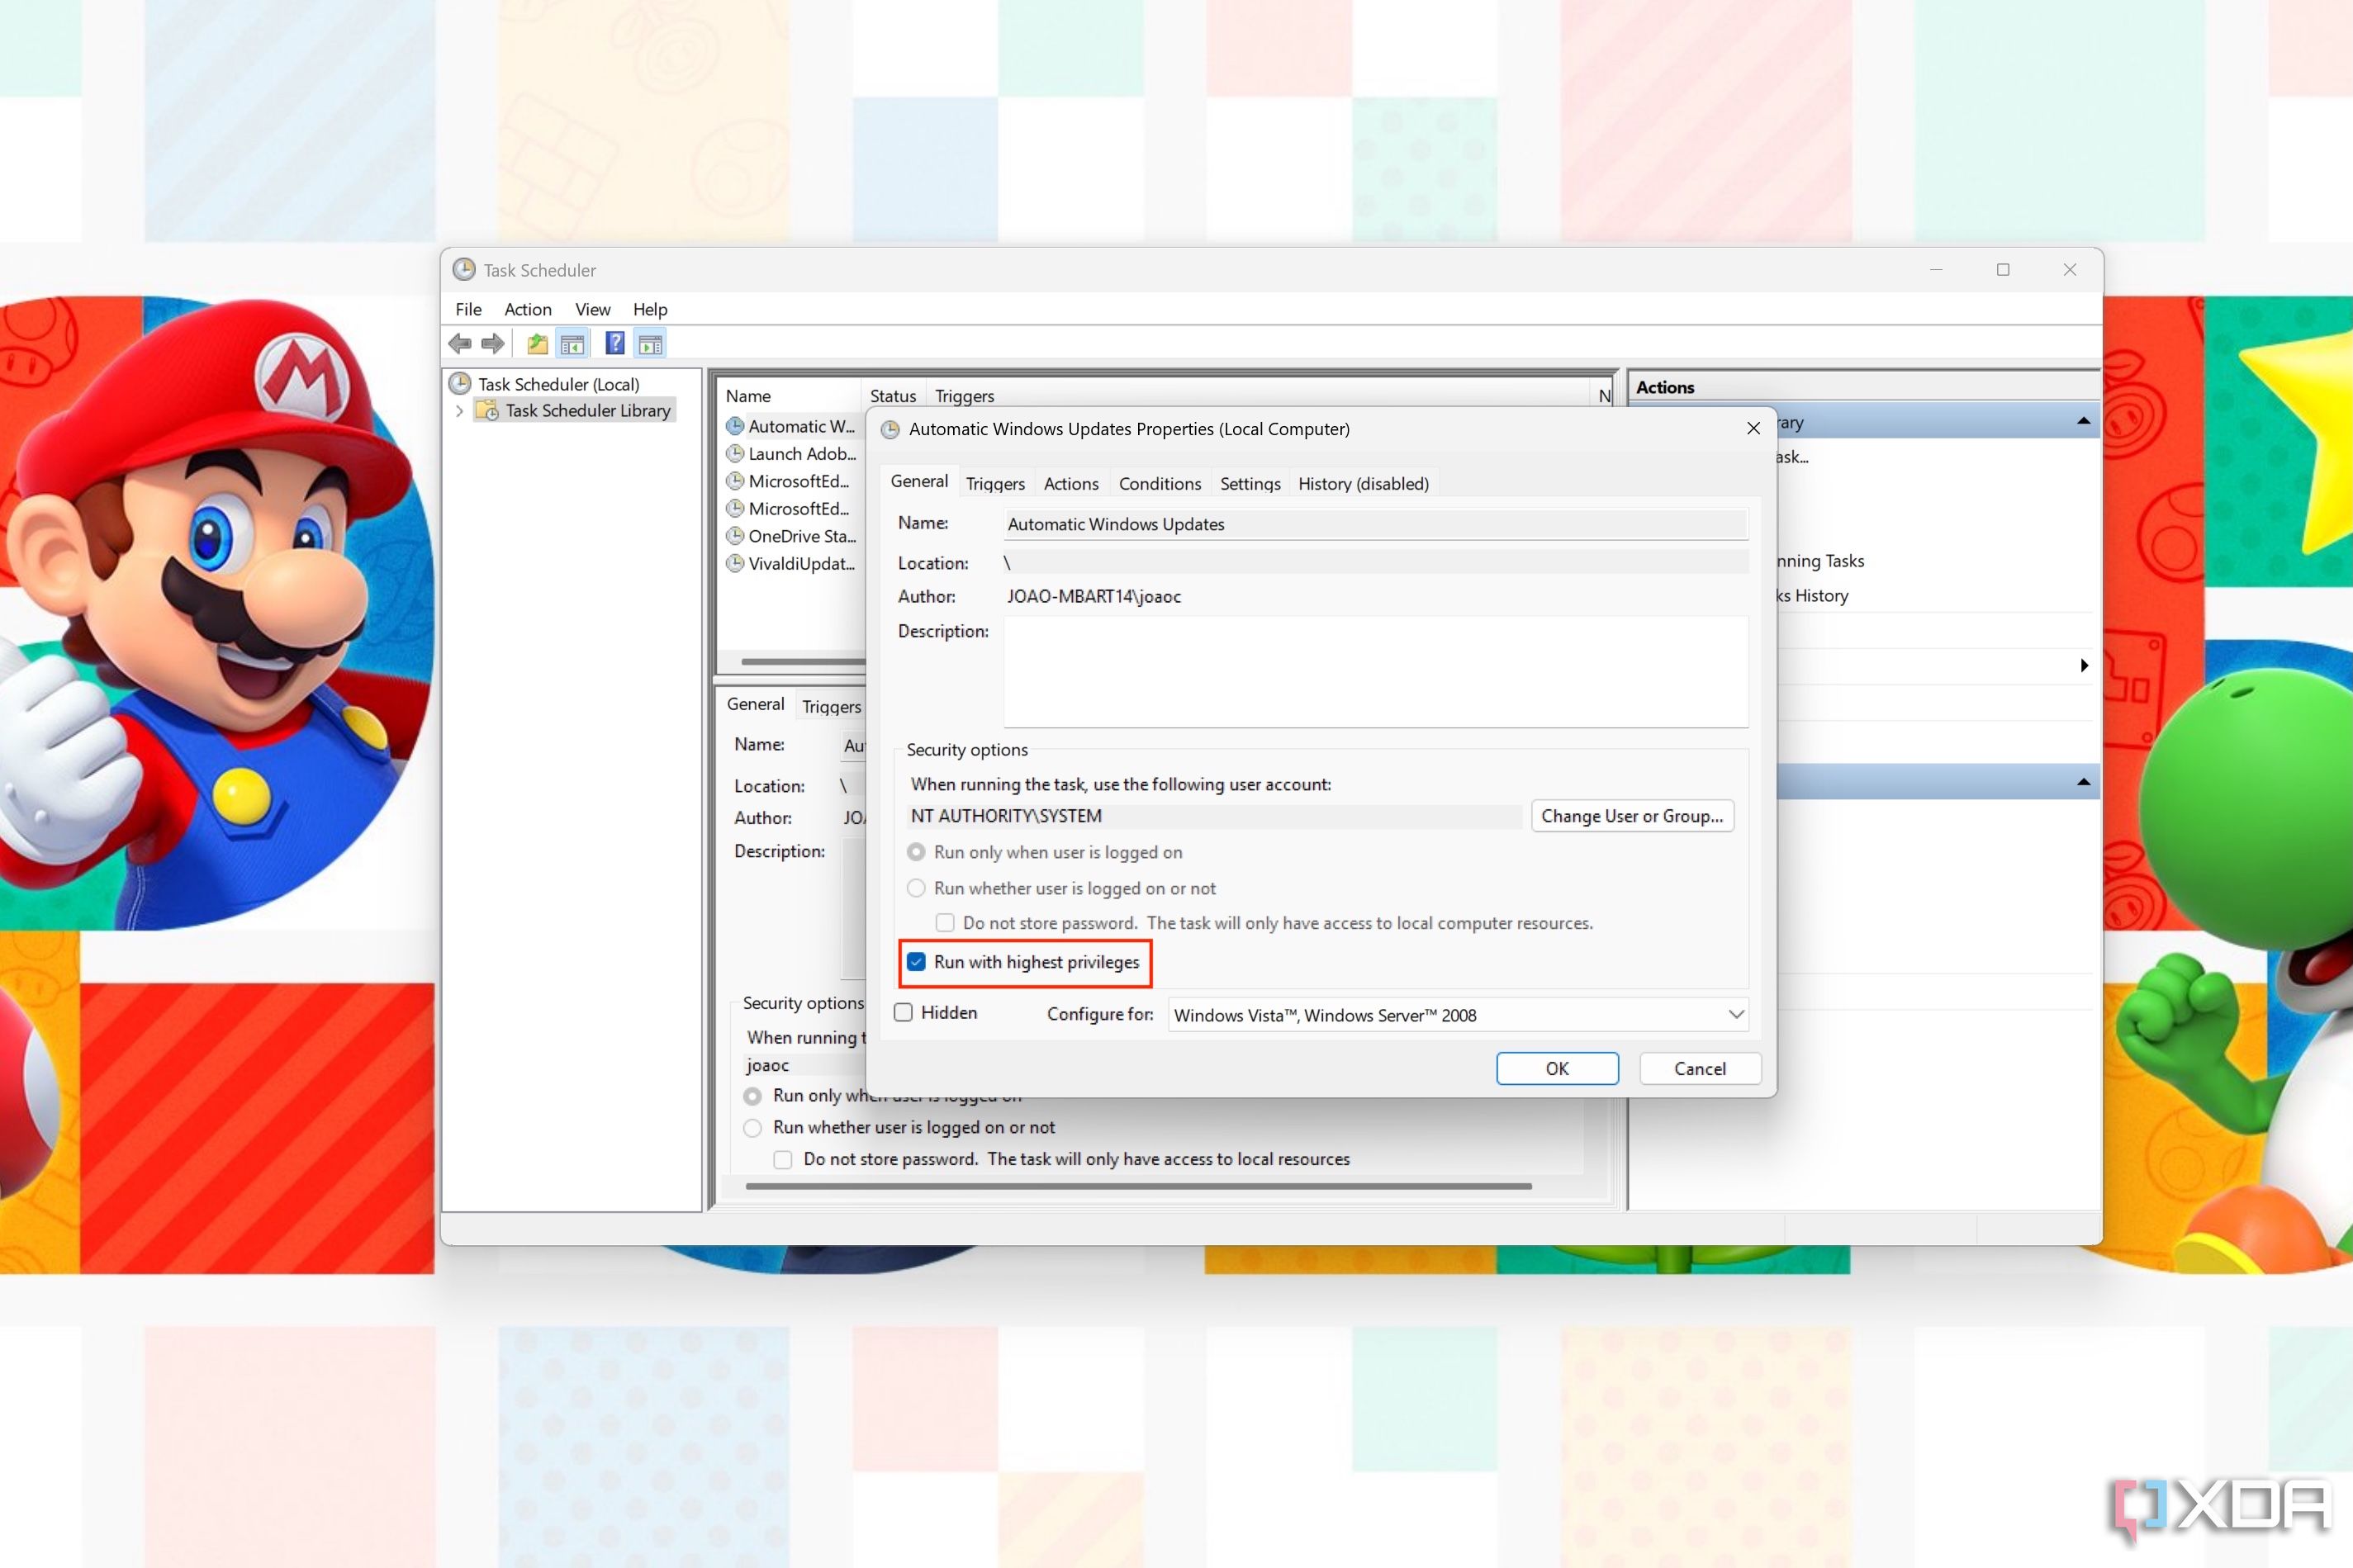
- Click OK.
- Check the box labeled Run with highest privileges.
- (Optional) You may also want to go to the Conditions tab and uncheck the box that says Start the task only of the computer is on AC power. This will allow the task to run even if a laptop is unplugged from a charger.
- Click OK to finish setting up.
The script will now run automatically everyday at the time you set (unless you chose a different repeat schedule). Alternatively, if you want ot use PowerShell for this as well, you can use a script to create a scheduled task. For that, you’ll use Notepad again as we did above, but then copy this example text instead. You can modify the time variables to whatever matches your needs. Follow the same overall steps to create the PS1 file and then run it manually (you only need it once). Also make sure to change the path to the script to match where you’ve stored the PS1 file.
Explore potential additions to the script
The script above is a relatively basic one that will check for Windows updates and install them, but that’s about it. There’s no logic for handling potential errors, and it won’t detect non-Windows updates, for example. There are some changes you can make to address some of these shortcomings if you need to
If you’d like to include other Microsoft software updates when installing updates, you can add -MicrosoftUpdate as an argument next to -Install-WindowsUpdate in the script we created. Essentially, the ew line would look like this:
Install-WindowsUpdate -MicrosoftUpdate -AcceptAll -AutoReboot -Verbose | Tee-Object -FilePath $LogPath -Append

If you're in a large organization and running this script across multiple PCs, you may also want to throttle bandwidth for each one. You can add the -ThrottleDownload argument to do this. Again, if you were modifying the base script, the new line would look like this (as an example):
Install-WindowsUpdate -ThrottleDownload 5Mbps -AcceptAll -AutoReboot -Verbose | Tee-Object -FilePath $LogPath -Append
It’s also possible to use this script on remote machines with PowerShell Remoting, so that’s another consideration to make. In this case, you’d first have to enable PowerShell Remoting with the Enable-PSRemoting -Force command, and then modify your script to run on the desired machines. You can find an example script for this here (courtesy of Paul Amman in this Medium post). You’ll have to modify it with the appropriate computer names you want to target, though.
If there are any errors with updates, you can use the Event Viewer to see what happened, or browse to the location where your log files are stored to see what’s shown there.
Make Windows Updates easy
Windows Update can definitely be annoying at times, but this PowerShell script makes things much easier in that you no longer have to worry about the computer installing updates and rebooting when you don’t want it to. Since everything happens on a set schedule, you won’t have to worry about any surprises being forced onto you. Even if you’re not technically inclined, these steps are easy enough to follow, so it’s worth a shot.