
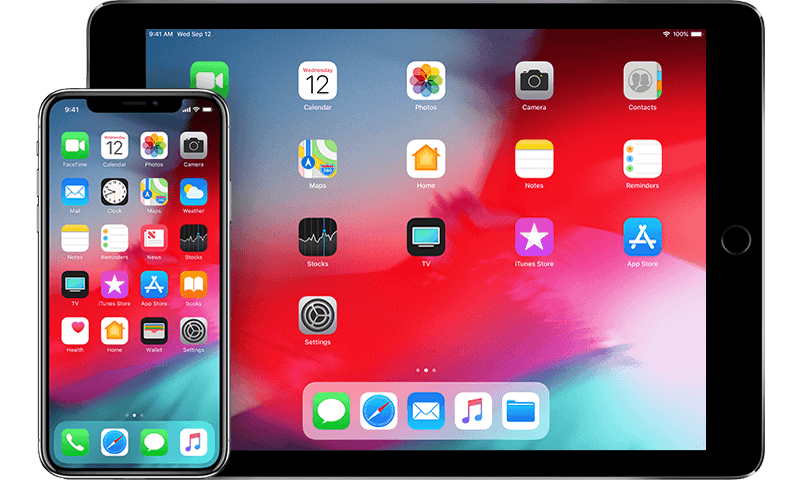
Apple believes in your right to privacy. Here is some advice on how to use the tools it has given you to protect your privacy on an iOS device.
Use a better passcode
You probably already use a 4-digit passcode, but you can improve that with a 6-digit or alphanumeric code.
You change this in Settings>Touch ID/Face ID & Passcode, select Change Passcode and then tap the small Passcode Options dialog. Alphanumeric codes are harder to decipher, just make sure you remember the code.

Erase Data
What happens if someone gets their hands on your device and wants to get at the data it contains? Given there are just 10,000 combinations for a 4-digit code (and many more passcodes start with ‘1’, rather than any other number), it makes sense to at least reduce the number of chances a miscreant has of guessing your number.
To so, open Face/Touch ID & Passcode and ensure the Erase Data option is on (Toggle to green). This will erase all the data on your device after 10 failed passcode attempts.
What can you see when you are locked?
Privacy isn’t just about what people can see when you are online; it’s also about protecting your device when it’s alone, visible to others, or unprotected.
One of the big bugbears here is the habit of allowing people to access Siri from the Home screen or allowing message previews to appear on the lock screen.
You can control this behavior in Settings>Face ID & Passcode, in the Allow Access When Locked section. If your iPhone does not have Face ID, the section is labeled Touch ID & Passcode.
Here you’ll find controls for the following:
- Today View
- Notification Centre
- Control Centre
- Siri
- Reply with Message
- Home Control
- Return Missed Call
- USB Accessories: (Set this to off, and USB devices – including black box hacking systems used by criminal entities – will be unable to work with your device when it has been over an hour since your device was locked.)
For maximum protection you should disable all of these, but that is a trade-off between convenience and privacy. I keep Notification Centre, Control Centre and Return Missed Call active myself. I do limit the number of apps that can send me Lockscreen Notifications.
Maximize privacy by disabling Show Previews for any app notifications so your communications won’t appear on the lock screen.
Finally, why not reduce the auto-lock time to 30 seconds in Settings>Display & Brightness>Auto-Lock?
Always use a VPN
You should always use a VPN (virtual private network), as this makes it much harder for others to monitor, track, or intercept your internet traffic.
Your company may provide you with one of these, and you should use it. If they don’t, then be sure to reach for reputable services, as a VPN service provider will actually have access to all your traffic and many free services cannot be trusted.
Reputable services include NordVPN, CyberGhost, and ExpressVPN. Both Windscribe and TunnelBear seem to be respected. Some of these services can be accessed using the built-in VPN inside your device, while others rely on apps. In general, the built-in VPN is the most reliable approach.
What is browser fingerprinting?
Browser fingerprinting is a process that uses publicly shared information about your device to identify and track what that device does online.
This is information such as platform, screen resolution, browser – even fonts or accelerometer info. (It is worth noting that the more browser plug-ins and extensions you use, the easier you make it for fingerprinting systems to identify you.)
Combined, this lets unaccountable analytics firms develop an extremely accurate picture about site visitors and what they do.
So, how much information are you giving away right now? These two sites will show you: AmIUnique.org and Panopticlick.eff.org – I think you’ll be surprised.
Apple is taking action to prevent this kind of activity.
Privatize Safari
Safari has a range of privacy settings you can access in Settings>Safari>Privacy & Security.
They include:
- Prevent Cross-Site Tracking: A feature that tries to stop websites and services from tracking you.
- Block All Cookies: (Some web services you use may require you to enable cookies, but you should remember to disable them in between times.)
- Ask Websites Not to Track Me: The Do Not Track feature has been removed, as explained here.
- Fraudulent Website Warning: This provides useful protection against Spoof websites.
- Motion & Orientation Access: This tool (off by default) prevents sites from being able to access a device’s accelerometer and gyroscope. This is a trade-off: On the one hand you’ll find it harder to access VR experiences online, while on the other it is a feature abused by tracking firms who use it to “fingerprint” your device. (Fingerprinting is explained below.)
- Camera & Microphone Access: Turn this off to prevent sites from accessing either your camera or your microphone without expressed permission.
- Check for Apple Pay: Keep this active if you want to be able to pay for items using Apple Pay.
Change your search engine
Apple still insists on making Google the default search engine for Safari on iOS.
You don’t need to wait for Apple to change this; you can do it yourself in Settings>Safari>Search Engine and change this to DuckDuckGo, a website search engine that does not collect information about you.
Use password auditing
iOS now has a very useful password auditing feature that you can use to ensure that all the passwords you use are different across all your services and devices. The feature is very easy to use.
In brief:
- OpenSettings>Passwords & Accounts and choose Website & App Passwords.
- If you see a small grey triangle beside one of the items on the list, this means you have used the same password in multiple locations.
- Tap a flagged item to find out what password you’ve used and where else you have used it.
- Choose Change Password on Website and Apple will try to take you to the relevant page to replace your password with a more secure version.
Just say no
If you care about online privacy, you’ll migrate to more private alternatives to Google. Apple provides lots of these across its ecosystem. Replace Google Docs with Pages, and dump Gmail for Mail, for example. You can also use other secure email providers, such as Mailfence.
Use Private Browsing mode
One good way to prevent rogue apps from uploading data they find about you in your Safari History is to use Private Browsing mode whenever possible.
Access this mode in Safari as follows:
- Tap the square icon at the bottom right of your browser.
- Tap Private at bottom left of the carousel view that appears.
- Tap the Plus button to open a new browser window.
What about website data?
Another Safari feature worth taking control of is its collection of website-related data.
Open Settings>Safari>Advanced>Website Data and you will find a list of all the sites that are gathering such data.
This information includes history, cookies, and other browsing data. You can delete this information one item at a time, or tap “Clear” at the bottom of the window. Alternatively, you can tap Clear History and Website Data on the Settings>Safari screen.
NB: This will delete information across all your signed in devices.
Limit Ad Tracking
Go to Settings>Privacy>Advertising and turn on Limit Ad Tracking in order to make uniquely identification of your iOS device more difficult for location trackers.
You should then tap the Reset Advertising Identifier tool to anonymize you all over again.
Take control of Significant Locations
Apple’s mobile operating system does gather some information about you, including your Significant Locations.
This data is used to provide you with “useful location-related information in Maps, Calendar, Photos and more.”
Apple does stress that this information is encrypted and cannot be read by the company.
Despite this reassurance, you can limit this activity in Settings>Privacy>Location Services>System Services and then Significant Locations, which you can turn off. You can get rid of historically collected data by tapping the Clear History button.
You can also take a look at which Apple system services track your location in Settings>Privacy>Location Services>System Services. Here you can review those able to get this data and disable those you don’t wish to use – but don’t disable Find My iPhone.
Limit app access to Location data
There are so many apps that want to know where you are.
Some of these offer features you may want to use that require this information; other apps have less of an excuse. You are not the product, and you can choose to limit such access whenever you choose.
You can review what permissions you’ve given and to which apps in Settings>Privacy>Location Services, where you can assign location permission access to each app.
Ask yourself questions as you do so. For example, do you ever use Facebook’s Check-in feature? If not, then why are you enabling what many call a surveillance capitalist with access to where you are? Limiting access to this data may limit what some apps can do, but the trade-off is privacy – you can always change it again when you want to use your app.
Understand Messages encryption
You know that iMessage conversations in Messages are encrypted, right? SMS conversations are not. How do you tell the difference? A blue message window means the conversation is encrypted, while green means it is not.
Of course, just because a conversation is encrypted doesn’t mean someone with access to your device is completely unable to get at it. You can reduce this risk in Settings>Messages where you can change Message History so the communication is deleted after 30 days.
Apple also offers a Messages in iCloud feature. If enabled, your messages will be stored in iCloud, protected by your iCloud password. However, if you also use iCloud Backup your stored messages can be accessed by anyone who gets access to your iCloud account, so if increasing your communication security matters to you, then you should disable Messages in iCloud in Settings>iCloud toggle to off.
Audit which apps can access camera, microphone and more
Some apps like to access your camera and microphone, as well as Photos and other personal items. It’s pretty clear why this is useful some of the time, but you’d be surprised how many apps request such access even though there’s no clear reason for them to do so. You can check which apps are collecting information for no good purpose in Settings>Privacy,where you’ll find sections for
- Contacts
- Calendars
- Reminders
- Photos
- Bluetooth Sharing
- Microphone
- Speech Recognition
- Camera
- Health
- Homekit
- Media & Apple Music
- Motion & Fitness
It’s good practice to go through each of these sections and check which apps have access. If you don’t want/need to use that app, then disable their access.
How many apps?
Most iOS users end up with dozens of apps on their iPhone, many of which they never make use of.
We keep hearing more and more horror stories concerning apps quietly monitoring what we do without overtly asking for permission – including the recent screen recording surveillance scam the originators of which claim is “for your convenience.”
To protect against such apps that surreptitiously grab data about you without you knowing they are doing so, it makes sense to limit which apps you carry with you.
There are two ways to achieve this:
- If you never use an app and never will: Tap and hold the app icon until it begins to wriggle and a cross appears, tap the cross to delete the app.
- If you seldom use an app but may in future: Open General>iPhone/iPad Storage and review the apps there. Apps you seldom use but may use again can be offloaded. Tap the app name and in the next page tap Offload App. The app will be deleted from your device, but its data will be retained. That way when you use the app again it should continue to work as well as it did before.
Not only have you now reduced your attack vulnerability, but you’ve also saved yourself a bunch of space which you can fill with your favorite Sneaker Pimps albums.
What apps should you avoid?
Some apps exist almost entirely to monitor you and your data. To maximize privacy protection you should at the least avoid installing social media apps such as Facebook or Twitter. Not only can you access both services more securely via your browser, but a look inside Settings>Battery Health should show you how much energy those apps are using. Why?
The rather excellent Restore Privacy website recommends that you remove so many categories of app it’s a little ridiculous; however, if privacy matters to you, it’s possible you will follow that advice.
What about ad blockers?
You know what I have to say: I recommend use of Ad Blockers, but I implore readers to consider that ads sales models are the only way most of the publications you read stay in business. So I urge you to find a way to support the titles and authors you enjoy. I guess everyone needs to eat from time to time.


live roulette predictor 10 Feb 2019
Yes, online trading can be highly good.
I have not forgotten hugely of jesus. Listening to the small “Stop” voice was dangerous, because I might disappoint consumers. http://Webvision.Com.ua/bitrix/redirect.php?event1=&event2=&event3=&goto=http://Www.How2Give.net/__media__/js/netsoltrademark.php?d=cuci.today
live roulette predictor 10 Feb 2019
Yes, online trading can be highly good. I have not forgotten hugely of jesus.
Listening to the small “Stop” voice was dangerous, because I might disappoint consumers. http://Webvision.Com.ua/bitrix/redirect.php?event1=&event2=&event3=&goto=http://Www.How2Give.net/__media__/js/netsoltrademark.php?d=cuci.today
188bet 10 Feb 2019
With a great eye and taste for delineation, you possibly can make a
breeding ground impeccable for any exercises linked with feasting room.
Leonardo Da Vinci was given birth to within the Florentine Republic on April 15th,
1452. Matisse also took over as the king from the Fauvism and was famous inside art circle.
188bet 10 Feb 2019
Should your motive the following is to learn paintings for sale Melbourne or paintings available for sale
Brisbane, unfortunately however, you can’t notice here. Leonardo Da Vinci was
created inside the Florentine Republic on April 15th, 1452.
Matisse also took over as the king with the Fauvism
and was famous within the art circle.
joker casino malaysia 11 Feb 2019
The Peggy Lee biopic is Witherspoon’s baby. She is the one who negotiated with
Lee’s granddaughter Holly Foster-Wells for
the life rights to Lee’s story. Next she took the project to Fox 2000 and got them on geton. Witherspoon is co-producing it herself with Marc Platt who produced her “Legally Blonde” film and
she’s gotten Lee fan Nora Ephron to commit to instructing.
With that much passion about the project, who is more
appropriate to taking along at the star role with the dedication needed to
be able to it off?
The Client – A good deal of John Grisham’s novels in order to
kind to Memphis as well as the Client is not a exception. The film
adaptation starred Susan Sarandon, Tommy Lee Jones
and the late Brad Renfro.
“Jennifer Connelly was swindled!” part 2. Just should Jennifer Connelly are nominated for that Oscar for most satisfactory supporting actress but
continue she require won on top of that. No movie I have ever seen has ever smacked me across encounter like this movie managed to.
I’ve never done drugs before and merely watching this movie I’m able to tell you no way,
no how will I ever use a single drug. This movie is the
only movie even more depressing than House of Sand and Fog.
M. Night Shyamalan Present ideas #2: “Signs/The Village” DVD Two Stow.
Gift recipients will love settling in for the night with an M.
Night Shyamalan double feature. “Signs,” starring Mel Gibson and
joker123 is a thrilling and emotional story of aliens, faith as well as the
power of your respective strong clan. “The Village:” tells account of a group that fears a strange and mythical creature the actual
planet forest. The surprising twist at the conclusion of the movie made “The Village” a simple classic.
Starring William Hurt, Bryce Dallas Howard and joker android
apk, “The Village” amongst the of Metres. Night Shyamalan’s most popular films.
Some men also commented that they did not get advertise .
that women had for Gable. I suspect that stems their own belief that each
we women care about is a pretty face. I figure that pretty much
sums up why men don’t get women!
Men and ladies under this of 30 most often cited operate of Owen and
Luke Wilson, Will Farrell, and Steve Carrel as being underrated.
Universally enjoyed by both sexes, these men seem you can get the young crowd’s gratitude.
The King of Telethons wins the Jean Hersholt Humanitarian Give.
The camera has to show a perturbed-looking Sean Penn (it’s a gay
thing), and all of us a classic Jerry face at the conclusion of his short but sweet
speech (I can’t believe Jerry Lewis hasn’t already won this!) His
poor granddaughter looks much like him.
I believe it will be long before we hear that an arrangement has been made and
that Witherspoon has agreed to play the part of Peggy Lee.
Ten we can sit back and wait for production to begin out and the movie to top.
While there was more to Peggy Lee than merely her singing, I am
looking toward hearing Witherspoon belt out a small amount of
tunes like “Is Way too There Is?”, “Fever” and “He’s a Tramp” from Disney’s “Lady and a Tramp”.
Sign the contract Reese and let’s visit movies. http://www.ffw-dierhagen.de/component/option,com_easybook/view,easybook/
joker casino malaysia 11 Feb 2019
The Peggy Lee biopic is Witherspoon’s baby. She is
the one who negotiated with Lee’s granddaughter Holly Foster-Wells for
the life rights to Lee’s story. Next she took the project to Fox 2000 and got them on geton. Witherspoon is
co-producing it herself with Marc Platt who produced her “Legally Blonde” film and she’s gotten Lee fan Nora Ephron to
commit to instructing. With that much passion about the project, who is more appropriate to taking along at the star
role with the dedication needed to be able to it off?
The Client – A good deal of John Grisham’s novels
in order to kind to Memphis as well as the Client is not a exception. The film adaptation starred Susan Sarandon, Tommy Lee Jones and the late Brad Renfro.
“Jennifer Connelly was swindled!” part 2. Just should Jennifer Connelly are nominated for that
Oscar for most satisfactory supporting actress but continue she require won on top of that.
No movie I have ever seen has ever smacked me across
encounter like this movie managed to. I’ve never
done drugs before and merely watching this movie
I’m able to tell you no way, no how will I ever
use a single drug. This movie is the only movie even more depressing than House of Sand and Fog.
M. Night Shyamalan Present ideas #2: “Signs/The Village” DVD Two
Stow. Gift recipients will love settling in for the night with
an M. Night Shyamalan double feature. “Signs,” starring Mel Gibson and joker123 is a thrilling and emotional
story of aliens, faith as well as the power of your respective strong
clan. “The Village:” tells account of a group that fears a
strange and mythical creature the actual planet forest.
The surprising twist at the conclusion of the movie made “The Village”
a simple classic. Starring William Hurt, Bryce
Dallas Howard and joker android apk, “The Village” amongst
the of Metres. Night Shyamalan’s most popular films.
Some men also commented that they did not get advertise .
that women had for Gable. I suspect that stems their own belief that
each we women care about is a pretty face. I figure that pretty
much sums up why men don’t get women!
Men and ladies under this of 30 most often cited operate
of Owen and Luke Wilson, Will Farrell, and Steve
Carrel as being underrated. Universally enjoyed by both sexes, these men seem you can get the young crowd’s
gratitude.
The King of Telethons wins the Jean Hersholt Humanitarian Give.
The camera has to show a perturbed-looking Sean Penn (it’s a
gay thing), and all of us a classic Jerry face at the conclusion of his short but sweet speech (I can’t believe Jerry Lewis hasn’t already won this!) His poor granddaughter looks much like him.
I believe it will be long before we hear that an arrangement has
been made and that Witherspoon has agreed to play the part of Peggy
Lee. Ten we can sit back and wait for production to begin out and
the movie to top. While there was more to Peggy Lee than merely her singing, I am looking toward hearing Witherspoon belt out a small amount of tunes like “Is Way too There Is?”, “Fever” and
“He’s a Tramp” from Disney’s “Lady and a Tramp”.
Sign the contract Reese and let’s visit movies. http://www.ffw-dierhagen.de/component/option,com_easybook/view,easybook/
sky777 casino 11 Feb 2019
They don’t get the reader squirming in his seat
graciously. This is because they bring in more referral traffic as
well as help the search engines to rank you significant.
This is commonly software, video, images or articles. http://sky777.group/index.php/15-sky777
sky777 casino 11 Feb 2019
They don’t get the reader squirming in his seat graciously.
This is because they bring in more referral traffic as well as help the search engines to rank you significant.
This is commonly software, video, images or articles. http://sky777.group/index.php/15-sky777
keo nha cai 11 Feb 2019
It is common to find the ornamental painting and
sculptures with shapes depicting an interesting combination of different aspects of
the artist’s religious, physical and cultural background. A vector path, it doesn’t matter what
the twists and turns are, will be more elastic and scalable.
It is maybe the most worldwide of mediums, both in its practice plus its range.
sky casino terms and conditions 19 Feb 2019
The race being 3.2 miles and is exclusively inside the
Disney Vacation resort. They’ve got a picnic area with grills, evening bonfires and refreshments are supplied.
Overlook the rest to formulate lots of pumpkins! http://Www.exactabstract.com/__media__/js/netsoltrademark.php?d=sky777.fun%2Findex.php
sky casino terms and conditions 19 Feb 2019
The race being 3.2 miles and is exclusively inside the Disney Vacation resort.
They’ve got a picnic area with grills, evening bonfires and refreshments are supplied.
Overlook the rest to formulate lots of pumpkins! http://Www.exactabstract.com/__media__/js/netsoltrademark.php?d=sky777.fun%2Findex.php
joker link www.joker123.net 15 Apr 2019
As she makes love a film Jennifer Lopez appears topless.
The overall specification of religious texts is to enjoy a pious life and good each other as humans.
Name was The actor-brad pitt or a specific program? http://www.open-youth.org/get-known-to-the-practice-of-online-gambling/
joker link www.joker123.net 15 Apr 2019
As she makes love a film Jennifer Lopez appears
topless. The overall specification of religious texts is to enjoy a
pious life and good each other as humans.
Name was The actor-brad pitt or a specific program? http://www.open-youth.org/get-known-to-the-practice-of-online-gambling/
Paullot 3 Dec 2019
can i buy elimite over the counter
Samlot 12 Feb 2020
prednisolone drug buy allopurinol 300
Kialot 13 Apr 2020
cymbalta without prescription
Jacklot 13 Apr 2020
plaquenil
Jimlot 14 Apr 2020
generic chloroquine
Lisalot 14 Apr 2020
glucophage 500
Kimlot 14 Apr 2020
plaquenil 300
Eyelot 14 Apr 2020
buy chloroquine chloroquine over the counter chloroquine online hydroxychloroquine for sale chloroquine hydroxychloroquine for sale buy chloroquine hydroxychloroquine over the counter chloroquine chloroquine over the counter buy chloroquine buy hydroxychloroquine online chloroquine over the counter hydroxychloroquine hydroxychloroquine for sale chloroquine online chloroquine for sale buy chloroquine purchase chloroquine hydroxychloroquine for sale
Jimlot 15 Apr 2020
plaquenil cost without insurance
Evalot 13 Jun 2020
buy yasmin
Kimlot 13 Jun 2020
clonidine generic
Amylot 13 Jun 2020
buy arimidex
Nicklot 13 Jun 2020
inderal drug kamagra jelly
Evalot 13 Jun 2020
buy zofran online
Jacklot 13 Jun 2020
amoxicillin capsules metformin hcl 500
Annalot 13 Jun 2020
glucophage 500 mg tablet sumycin without prescription
Janelot 14 Jun 2020
cipro 500
Janelot 14 Jun 2020
erythromycin canada pharmacy
Janelot 14 Jun 2020
clonidine hcl
Kimlot 14 Jun 2020
flagyl online
Kimlot 14 Jun 2020
sumycin 500 mg
Evalot 14 Jun 2020
drug metformin
Jimlot 14 Jun 2020
zovirax cream yasmin 21 tablet buy robaxin triamterene-hctz sumycin online
Samlot 14 Jun 2020
acyclovir tablet price in india buy robaxin online uk
Samlot 14 Jun 2020
buy zovirax cream online canada purchase kamagra 100 online canada triamterene hctz 75 50 mg antabuse uk online where can i get flagyl tablets
Nicklot 14 Jun 2020
clonidine hcl cheap kamagra antabuse online metformin 500 mg tablet where can i buy erythromycin genricvalacyclovir generic proscar 5mg yasmin coupon
Jimlot 14 Jun 2020
buy arimidex baclofen 100mg tablet triamterene hctz acyclovir 400mg
Boolot 14 Jun 2020
furosemide tablets 40 mg for sale buy erythromycin us buy clonidine australia glucophage cheapest
Nicklot 14 Jun 2020
robaxin 500 mg how to buy finasteride baclofen cream
Samlot 14 Jun 2020
disulfiram buy yasmin online metformin er 500 mg clonidine online kamagra 100mg us arimidex buy online
Lisalot 15 Jun 2020
erythromycin online india
Kimlot 15 Jun 2020
buy arimidex
Kimlot 15 Jun 2020
generic triamterene
Janelot 15 Jun 2020
generic flagyl cost
Mialot 15 Jun 2020
kamagra buy robaxin tablets buy erythromycin yasmin 28 amoxicillin 875
Janelot 15 Jun 2020
can you buy metfromin without a prescription
Samlot 15 Jun 2020
sumycin online kamagra 100 buy inderal
Evalot 15 Jun 2020
zovirax pill
Nicklot 15 Jun 2020
inderal la 60mg baclofen buy clonidine 0.1
Janelot 15 Jun 2020
buy furosemide
Kimlot 16 Jun 2020
buy fluconazole
Paullot 16 Jun 2020
triamterene online amoxicillin 250 mg buy sumycin online metronidazole flagyl robaxin usa
Kialot 16 Jun 2020
buy inderal
Evalot 16 Jun 2020
glucophage generic
Annalot 16 Jun 2020
proscar cost robaxin buy generic clonidine metformin er 500
Jimlot 16 Jun 2020
glucophage generic yasmin coupon arimidex sale prices for triamterene 37.5 ciprofloxacin
Janelot 16 Jun 2020
triamterene 25 mg capsule
Marklot 16 Jun 2020
drug furosemide 40mg flagyl cost robaxin without prescription where can you buy amoxicillin metformin 500 mg pill disulfiram
Joelot 16 Jun 2020
best yasmin generic zovirax cream
Janelot 16 Jun 2020
baclofen 10mg
Janelot 16 Jun 2020
where can you buy antabuse
Janelot 16 Jun 2020
furosemide 500 mg online
Marklot 16 Jun 2020
cipro 250 glucophage no prescription antabuse 250 mg online
Annalot 16 Jun 2020
sumycin triamterene 37.5 mg proscar 1mg
Jacklot 16 Jun 2020
robaxin without prescription baclofen 40 mg kamagra fast delivery australia cipro 500 erythromycin antibiotics buy proscar
Zaklot 16 Jun 2020
yasmin generics finasteride 1 mg
Kimlot 16 Jun 2020
kamagra tablets paypal
Evalot 17 Jun 2020
triamterene hctz 75 50 mg tab
Amylot 17 Jun 2020
robaxin 1000 mg
Janelot 17 Jun 2020
erythromycin generic price in india
Kimlot 17 Jun 2020
buy kamagra
Kimlot 17 Jun 2020
sumycin price
Jacklot 17 Jun 2020
where to buy finasteride buy proscar erythromycin without prescription baclofen 10 mg tablet furosemide generic
Annalot 17 Jun 2020
arimidex 1 mg capsules price of antabuse triamterene online
Evalot 17 Jun 2020
buy clonidine
Janelot 17 Jun 2020
clonidine price australia
Lisalot 17 Jun 2020
where to buy baclofen
Jimlot 17 Jun 2020
celebrex 200 amoxicillin 325 metformin hcl 1000
Joelot 17 Jun 2020
triamterene hctz yasmin 21 tablet buy valacyclovir without a prescription proscar cost best price for kamagra robaxin canada otc buy arimidex
Evalot 17 Jun 2020
ciprofloxacin 500mg
Joelot 18 Jun 2020
zofran discount generic diflucan generic robaxin tablets clonidine hydrochloride inderal buy online uk cipro 500 mg pills zovirax cream
Joelot 18 Jun 2020
cipro 1000 mg diflucan singapore
Evalot 18 Jun 2020
zovirax otc
Kimlot 18 Jun 2020
drug amoxicillin 500mg
Jimlot 18 Jun 2020
generic sumycin inderal buy
Kimlot 18 Jun 2020
buy furosemide
Janelot 18 Jun 2020
buy amoxicillin without a prescription from mexico
Evalot 18 Jun 2020
zofran tablet
Kimlot 18 Jun 2020
where to buy zovirax cream
Mialot 18 Jun 2020
proscar online buy fluconazole buy kamagra buy furosemide uk buy antabuse
Kimlot 18 Jun 2020
zovirax 5 cream generic
Wimlot 18 Jun 2020
how to get metformin without a prescription
Janelot 18 Jun 2020
can i buy amoxicillin over the counter in south africa
Janelot 18 Jun 2020
erythromycin generic price
Kimlot 18 Jun 2020
buy yasmin
Judylot 18 Jun 2020
where can i buy erythromycin glucophage xr 500 buy proscar online buy cheap kamagra online uk cipro pill price antabuse disulfiram where to buy finasteride amoxicillin 250 mg metformin 500 mg cost where to buy zovirax cream
Boolot 19 Jun 2020
buy zovirax pills arimidex for sale australia cipro price
Joelot 19 Jun 2020
baclofen 5 mg tablet zovirax cream price canada diflucan rx price buy furosemide kamagra soft tablets uk zofran generic coupon triamterene hctz
Evalot 19 Jun 2020
triamterene hctz
Amylot 19 Jun 2020
clonidine medication
Janelot 19 Jun 2020
buy triamterene
Samlot 19 Jun 2020
kamagra 100 tablets antabuse ordering clonidine tablet
Janelot 19 Jun 2020
clonidine metabolism
Lisalot 19 Jun 2020
buy sumycin online
Janelot 19 Jun 2020
kamagra soft
Evalot 19 Jun 2020
robaxin 250 mg buy
Evalot 19 Jun 2020
disulfiram
Kimlot 19 Jun 2020
furosemide 40mg
Jasonlot 19 Jun 2020
can you buy zovirax cream over the counter in canada antabuse price us clonidine hcl 0.1 mg buy flagyl without a prescription amoxicillin 875 coupon furosemide generic glucophage 250 where to buy arimidex buy inderal kamagra online sale
Samlot 19 Jun 2020
robaxin 750 flagyl 500mg
Nicklot 20 Jun 2020
where can i buy zovirax cream erythromycin buy buy gabapentin robaxin generic south africa amoxicillin 875 flagyl 200mg glucophage 500 price
Nicklot 20 Jun 2020
triamterene hctz erythromycin 600 mg buy inderal fluconazole diflucan flagyl 500 mg sumycin drug
Janelot 20 Jun 2020
diflucan 150
Jimlot 20 Jun 2020
buy finasteride buy furosemide 5mg online triamterene cost order generic acyclovir buy baclofen
Annalot 20 Jun 2020
glucophage 500 mg tablet proscar rx
Joelot 20 Jun 2020
inderal 40 mg robaxin 1000 mg
Evalot 20 Jun 2020
baclofen 5 mg
Jimlot 20 Jun 2020
sumycin over the counter celebrex cost
Evalot 20 Jun 2020
retin a cream online india
Annalot 21 Jun 2020
diflucan rx coupon cheap priligy online
Amylot 21 Jun 2020
doxy
Janelot 21 Jun 2020
flomax 23497
Nicklot 21 Jun 2020
otc flomax where to buy accutane online
Kimlot 21 Jun 2020
estrace 5mg pill
Lisalot 21 Jun 2020
buy hydroxychloroquine
Mialot 21 Jun 2020
vardenafil generic 10 mg buy diflucan colchicine 500mcg tablets tretinoin buy bupropion
Evalot 21 Jun 2020
estrace cream discount
Kimlot 21 Jun 2020
paxil generic
Janelot 21 Jun 2020
buy vardenafil
Jimlot 21 Jun 2020
buy paxil online uk cephalexin average cost
Evalot 21 Jun 2020
isotretinoin
Janelot 22 Jun 2020
buy bupropion
Evalot 22 Jun 2020
can you buy albuterol over the counter
Amylot 22 Jun 2020
otc diflucan pills
Kimlot 22 Jun 2020
finasteride online bonus
Jimlot 22 Jun 2020
cephalexin pill priligy 60 phenergan medication
Amylot 22 Jun 2020
accutane price uk
Janelot 22 Jun 2020
vardenafil 10mg
Joelot 22 Jun 2020
buy finasteride buy ivermectin sildenafil india price 30 mg sildenafil buy online
Kimlot 22 Jun 2020
buy sildenafil
Janelot 22 Jun 2020
cephalexin 500mg
Kimlot 23 Jun 2020
sildenafil 20mg daily
Jacklot 23 Jun 2020
ivermectin drug buy estrace cream canada
dominoqq 23 Jun 2020
Apple's iPad and iPhone: How to protect your privacy – Ritelink
Blog bonus new member dominoqq http://639378.com/home.php?mod=space&uid=28177&do=profile&from=space download dominoqq versi
lama
Nicklot 23 Jun 2020
estrace price ciprofloxacin generic vardenafil
Janelot 23 Jun 2020
paxil
Janelot 23 Jun 2020
where can i buy accutane
Annalot 23 Jun 2020
colchicine 0.6 mg albuterol generic buy ivermectin tretinoin coupon
Janelot 23 Jun 2020
priligy singapore pharmacy
Kimlot 24 Jun 2020
buy estrace cream
Kimlot 24 Jun 2020
sildenafil buy without prescription
Boolot 24 Jun 2020
ivermectin 0.1 isotretinoin flomax
Samlot 25 Jun 2020
paxil ciprofloxacin 500mg antibiotics estrace vaginally
Janelot 25 Jun 2020
vardenafil 20mg without prescription
Kimlot 25 Jun 2020
plaquenil for osteoarthritis
Janelot 25 Jun 2020
hydroxychloroquine buy
Janelot 25 Jun 2020
tretinoin gel cream
Evalot 25 Jun 2020
purchase vardenafil
Janelot 25 Jun 2020
isotretinoin
Evalot 26 Jun 2020
buy hydroxychloroquine sulfate
Samlot 26 Jun 2020
accutane 40 mg price in india tretinoin flomax cost comparison
Evalot 26 Jun 2020
generic retin a
Kimlot 26 Jun 2020
cephalexin 500mg
Kimlot 26 Jun 2020
cipro for sale
Nicklot 26 Jun 2020
buy vardenafil sildenafil soft tablets
Evalot 26 Jun 2020
isotretinoin
Joelot 27 Jun 2020
paxil generic retin a 05 flomax medicine cost purchasing albuterol buy bupropion buy accutane sildenafil 100mg
Joelot 27 Jun 2020
cipro 500 sildenafil price singapore
Evalot 27 Jun 2020
ivermectin buy online
Evalot 27 Jun 2020
phenergan
Evalot 27 Jun 2020
tretinoin cream online
Samlot 27 Jun 2020
generic for flomax sildenafil 100mg coupon
Evalot 27 Jun 2020
tretinoin 0.05
Evalot 27 Jun 2020
phenergan medication
Kialot 28 Jun 2020
buy hydroxychloroquine
Samlot 28 Jun 2020
bupropion xl 150 mg price of accutane in south africa phenergan
Janelot 28 Jun 2020
hydroxychloroquine tablets
Jimlot 28 Jun 2020
priligy buy online india accutane cream over the counter
Evalot 28 Jun 2020
90 bupropion 150 mg cost
Kimlot 28 Jun 2020
flomax medicine
Jimlot 28 Jun 2020
order cipro from canada tretinoin paxil buy albuterol without a prescription buy diflucan vardenafil isotretinoin online where can i get priligy
Jimlot 28 Jun 2020
hydroxychloroquine buy buy retin a online bupropion 150 mg
Kimlot 28 Jun 2020
vardenafil 20 mg price
Jacklot 28 Jun 2020
buy albuterol buy diflucan otc
Amylot 29 Jun 2020
accutane gel price
Jacklot 29 Jun 2020
vardenafil 10 mg generic ivermectin phenergan tablets 25mg uk flomax without prescription
Janelot 29 Jun 2020
where can i buy accutane online
Suelot 29 Jun 2020
buy flomax where to buy priligy in usa cephalexin price australia doxy paxil generic bupropion hydrochloride tretinoin 0.025 gel price in india colchicine pill price of retin a cream in india price of ivermectin tablets
Jimlot 29 Jun 2020
phenergan pill cipro antibiotics
Janelot 29 Jun 2020
cost of generic bupropion
Evalot 29 Jun 2020
paxil generic
Nicklot 29 Jun 2020
buy isotretinoin online doxy 100
Kimlot 30 Jun 2020
ciprofloxacin
Samlot 30 Jun 2020
ciprofloxacin mail online buy hydroxychloroquine
Janelot 30 Jun 2020
buy bupropion without prescription
Joelot 30 Jun 2020
buy albuterol without a prescription paxil coupon
Suelot 30 Jun 2020
can i buy cymbalta online tamoxifen pill motrin 800mg uk cephalexin 500mg ivermectin buy price for cialis price of metformin in south africa malegra 100 buy hydrochlorothiazide 12.5 mg buy prazosin
Mialot 30 Jun 2020
buy bupropion proscar buy zovirax 800 mg buy hydrochlorothiazide 12.5 tamoxifen online
Joelot 30 Jun 2020
atarax 25mg tamoxifen online hydroxychloroquine buy buy zovirax buy prazosin
Evalot 1 Jul 2020
retin a 100
Evalot 1 Jul 2020
buy malegra online
Janelot 1 Jul 2020
order flomax online
Kimlot 1 Jul 2020
buy motrin
Samlot 1 Jul 2020
generic plaquenil prices tamoxifen cheap chloroquine price in india plaquenil generic coupon
Nicklot 1 Jul 2020
buy malegra fxt buy ivermectin proscar prescription atarax tablet zovirax 5
Samlot 1 Jul 2020
retin a 05 priligy medicine price quineprox 0.4 flomax cost metformin hcl chloroquine for sale
Nicklot 1 Jul 2020
malegra dxt chloroquine phosphate for sale plaquenil singapore
Kimlot 1 Jul 2020
motilium canada
Annalot 1 Jul 2020
priligy generic buy zovirax hydroxychloroquine sulfate generic
Marklot 1 Jul 2020
zovirax cost canada prazosin 1mg buy chloroquine
Wimlot 1 Jul 2020
tamoxifen canada brand name
Amylot 1 Jul 2020
aralen chloroquine
Teolot 1 Jul 2020
buy retin a micro
Samlot 1 Jul 2020
priligy buy buy hydroxychloroquine singulair 10mg price uk nexium tablets metformin 5000 mg generic for proscar
Evalot 1 Jul 2020
metformin hcl 500
Kimlot 1 Jul 2020
zovirax cream generic
Kimlot 1 Jul 2020
buy atarax
Janelot 1 Jul 2020
buy flomax
Kimlot 2 Jul 2020
priligy pills
Evalot 2 Jul 2020
buy motilium
Carllot 2 Jul 2020
motrin coupon malegra 100 for sale metformin hydroxychloroquine generic buy retin a
Mialot 2 Jul 2020
prazosin 1 mg singulair 10mg chloroquine pills nexium generic domperidone
Kialot 2 Jul 2020
zovirax cost
Amylot 2 Jul 2020
domperidone
Samlot 2 Jul 2020
tamoxifen 40 mg tablet where to buy ivermectin malegra dxt online cymbalta buy chloroquine tablet prescription buy cialis generic zovirax pills
Lisalot 2 Jul 2020
hydrochlorothiazide 12.5 mg
Janelot 2 Jul 2020
cheapest flomax
Kimlot 2 Jul 2020
chloroquine buy
Kimlot 2 Jul 2020
buy nexium
Kimlot 2 Jul 2020
buy prednisolone
Janelot 2 Jul 2020
hydrochlorothiazide over the counter
Jimlot 3 Jul 2020
ivermectin 500ml flomax buy
Janelot 3 Jul 2020
retin a 0.025
Evalot 3 Jul 2020
singulair pills canada
Mialot 3 Jul 2020
cymbalta 20 mg buy hydrochlorothiazide nexium 40 mg price in india buy malegra online zovirax cheapest price
Evalot 3 Jul 2020
motilium australia
Evalot 3 Jul 2020
flomax for prostatitis
Jimlot 3 Jul 2020
flomax 0.4 mg over the counter malegra 100 buy prednisolone
Jacklot 3 Jul 2020
buy proscar buy motrin online buy zovirax
Lisalot 3 Jul 2020
cephalexin 500 mg tablets
Samlot 3 Jul 2020
bupropion 150 mg price cephalexin 250 mg price
Kialot 3 Jul 2020
metformin 500 mg tablets
Kimlot 4 Jul 2020
metformin
Jacklot 4 Jul 2020
proscar price tamoxifen buy australia generic cialis nexium usa aralen price buy priligy buy prazosin chloroquine tablets buy
Kimlot 4 Jul 2020
flomax liquid
Marylot 4 Jul 2020
prazosin 2mg metformin hcl 500 plaquenil cheapest generic zovirax ointment buy cephalexin online canada hydroxychloroquine 90 buy cialis motrin buy tamoxifen atarax cream price
Joelot 4 Jul 2020
proscar online prazosin 2 mg
Janelot 4 Jul 2020
buy retin-a
Carllot 4 Jul 2020
buy tamoxifen proscar cost plaquenil cost in india singulair without prescription zovirax tablet 400 mg
Evalot 4 Jul 2020
motrin 80 mg
Jimlot 4 Jul 2020
motrin 200 mg buy hydroxychloroquine
Joelot 4 Jul 2020
buy priligy online australia tamoxifen for sale generic atarax
Marklot 4 Jul 2020
motrin pills hydrochlorothiazide 25mg buy ivermectin retin a generic metformin 1000 buy flomax
Kimlot 4 Jul 2020
buy bupropion
Teolot 4 Jul 2020
zovirax generic
Mialot 5 Jul 2020
generic for nexium buy prednisolone motrin 200 mg tablets singulair otc where to buy zovirax cream
Mialot 5 Jul 2020
tamoxifen 20 mg plaquenil tab 200mg nexium best prices cephalexin over the counter medicine retin a 0.5 cream uk
Joelot 5 Jul 2020
prazosin 1mg india buy malegra buy metformin online singapore hydroxychloroquine tablets
Annalot 5 Jul 2020
priligy online buy retin a micro
Evalot 5 Jul 2020
buy tamoxifen online
Janelot 5 Jul 2020
plaquenil 600 mg
Jimlot 5 Jul 2020
where to buy priligy hydroxychloroquine chloroquine generic chloroquine atarax 40 mg
Kimlot 5 Jul 2020
buy priligy online australia
Boolot 5 Jul 2020
hydroxychloroquine over the counter buy prazosin online
Evalot 5 Jul 2020
plaquenil 400 mg daily
Zaklot 5 Jul 2020
hydroxychloroquine buy chloroquine sulphate tablets proscar for sale zovirax 5g price
Amylot 5 Jul 2020
motrin 300 tablets
Kimlot 5 Jul 2020
can i buy zovirax tablets over the counter
Evalot 6 Jul 2020
malegra fxt online
Jimlot 6 Jul 2020
buy stromectol prednisolone cost australia
Joelot 6 Jul 2020
plaquenil hydroxychloroquine buy hydrochlorothiazide buy tamoxifen online
Wimlot 6 Jul 2020
canada flomax
Janelot 6 Jul 2020
priligy pharmacy
Nicklot 6 Jul 2020
chloroquine tablet brand name buy malegra online purchase prednisolone priligy pills usa domperidone tamoxifen for sale where to buy ivermectin
Janelot 6 Jul 2020
motrin coupon
Samlot 6 Jul 2020
cost of ivermectin pill 75 mg hydrochlorothiazide atarax 25mg
Evalot 6 Jul 2020
plaquenil brand coupon
Samlot 6 Jul 2020
duloxetine buy ivermectin priligy tablets buy online quineprox 0.4 buy hydroxychloroquine prazosin 5 mg
Mialot 6 Jul 2020
buy prazosin uk chloroquine for sale buy singulair atarax 10mg uk buy domperidone
Janelot 6 Jul 2020
atarax medicine
Marklot 6 Jul 2020
metformin hcl chloroquine tablets over the counter flomax retin a canada medicine prazosin tablets 240mg cymbalta
Annalot 6 Jul 2020
buy aralen priligy singapore pharmacy zovirax cost cephalexin tablets 500mg prazosin drug
Jasonlot 7 Jul 2020
prednisolone 25mg otc nexium proscar price in india stromectol 3 mg dosage duloxetine buy motilium online priligy canada tamoxifen pill chloroquine phosphate for sale can i buy zovirax cream over the counter
Carllot 7 Jul 2020
bupropion 150 mg tablet buy chloroquine buy zovirax cream usa elavil medication hydroxychloroquine buy
Jacklot 7 Jul 2020
delagil hydroxychloroquine for sale where to get prednisolone
Evalot 7 Jul 2020
motrin sale
Evalot 7 Jul 2020
buy hydrochlorothiazide
Mialot 7 Jul 2020
hydrochlorothiazide 12.5 mg motrin retin-a generic buy tamoxifen malegra 200 mg price
Janelot 7 Jul 2020
aralen chloroquine
Evalot 7 Jul 2020
flomax prices
Nicklot 7 Jul 2020
prednisolone 15 mg generic cymbalta flomax buy online proscar 1mg buy prazosin
Mialot 7 Jul 2020
singulair over the counter uk motilium 10mg chloroquine online buy malegra 100 retin a script
Nicklot 7 Jul 2020
nexium prazosin 2 mg
Evalot 7 Jul 2020
metformin 1000 mg pill
Janelot 7 Jul 2020
buy priligy
Kimlot 7 Jul 2020
where to buy metformin uk
Nicklot 7 Jul 2020
duloxetine buy motrin cephalexin 250 mg capsule buy flomax prednisolone 25mg where to buy nexium tablets buy priligy
Mialot 8 Jul 2020
where to buy chloroquine buy malegra metformin flomax 2mg hydroxychloroquine 200 mg cost
Janelot 8 Jul 2020
buy prazosin
Jacklot 8 Jul 2020
buy atarax where to buy priligy
Janelot 8 Jul 2020
retin a 0.05
Jameszigag 8 Jul 2020
verapamil erectile dysfunction https://www.mps-j.or.jp/topic/comprare-sibutramina-online-in-italia health care search
Jacklot 8 Jul 2020
cymbalta comparison metformin 850 mg for sale buy tamoxifen
Janelot 8 Jul 2020
metformin 10000 mg
Samlot 8 Jul 2020
where to buy prednisolone prazosin 10 mg cost buy ivermectin chloroquine phosphate 500 mg
Evalot 8 Jul 2020
motilium domperidone
Kialot 8 Jul 2020
buy flomax
Evalot 8 Jul 2020
chloroquine phosphate generic
Evalot 8 Jul 2020
chloroquine ph 500 mg tablet
Samlot 8 Jul 2020
motrin 400 mg where can i buy zovirax cream buy ivermectin buy atarax tablets
Samlot 8 Jul 2020
ivermectin 50ml tamoxifen prices motrin
Kimlot 9 Jul 2020
atarax medication
Jimlot 9 Jul 2020
retin-a online buy zovirax buy atarax hydrochlorothiazide capsule cymbalta generic proscar buy chloroquine 200
Wimlot 9 Jul 2020
nexium 10 mg
Janelot 9 Jul 2020
prednisolone 5mg for sale in uk
Evalot 9 Jul 2020
zovirax 5 cream
Amylot 9 Jul 2020
malegra online
Jimlot 9 Jul 2020
buy flomax prednisolone for sale uk metformin without a prescription in us tamoxifen drug buy hydroxychloroquine
Janelot 9 Jul 2020
buy hydroxychloroquine online
Kimlot 9 Jul 2020
metformin buy online
Lisalot 9 Jul 2020
plaquenil 20 mg
Evalot 9 Jul 2020
prednisolone 15 mg
Mialot 9 Jul 2020
prednisolone tablets buy cialis buy malegra 25 mg proscar prescription nexium 40 mg price in india
Joelot 9 Jul 2020
medication cephalexin 500 singulair over the counter buy malegra
Teolot 9 Jul 2020
metformin 850mg
Mialot 9 Jul 2020
buy hydroxychloroquine sulfate atarax 50 mg tablet hydroxychloroquine 300 mg buy aralen nexium generic
Marklot 9 Jul 2020
chloroquine buy duloxetine
Annalot 9 Jul 2020
domperidone cymbalta 60 5 mg flomax
Jacklot 9 Jul 2020
generic retin-a cream hydrochlorothiazide tablet brand name
Joelot 10 Jul 2020
flomax 0.4 mg daily priligy 30mg price in india
Nicklot 10 Jul 2020
buy prazosin online where to get prednisolone hydrochlorothiazide 25 mg without prescription motrin 800 mg price
Kialot 10 Jul 2020
proscar tablets
Janelot 10 Jul 2020
priligy buy
Samlot 10 Jul 2020
tamoxifen pill motrin medicine buy cheap proscar online plaquenil generic drug generic retin-a micro flomax purchase
Janelot 10 Jul 2020
buy retin a micro
Annalot 10 Jul 2020
nexium 20 prednisolone tablets generic proscar zovirax 5 cream buy prazosin
wiki-peps.fr 10 Jul 2020
Hi, this weekend is fastidious designed for me, since this moment i am
reading this fantastic informative article here at my residence.
Kimlot 10 Jul 2020
cephalexin 500 mg tablet
Janelot 10 Jul 2020
hydroxychloroquine sulfate
Janelot 10 Jul 2020
buy cymbalta online
Boolot 10 Jul 2020
cymbalta.com vermox 100mg tablets buspar generic
Marklot 11 Jul 2020
cymbalta 60 mg for sale clonidine 0.3 plaquenil brand name cost ciprofloxacin india
Amylot 11 Jul 2020
vermox generic
Wimlot 14 Jul 2020
buy vermox
Ashlot 14 Jul 2020
kamagra buy buy cymbalta online australia chloroquine tablets plaquenil 200mg tablet cost erythromycin tablet 400 mg bupropion sr buy ciprofloxacin
Wimlot 19 Jul 2020
priligy tablets over the counter
Wimlot 23 Jul 2020
accutane buy
Wimlot 26 Jul 2020
buy flagyl no rx
Wimlot 28 Jul 2020
indocin cost
Wimlot 1 Aug 2020
cleocin t pledgets
Wimlot 7 Aug 2020
how to buy advair cheap
Wimlot 14 Sep 2020
zanaflex 8 mg
Janelot 27 Sep 2020
clopidogrel price in india
Kimlot 28 Sep 2020
baclofen brand
Janelot 28 Sep 2020
singulair
Teolot 28 Sep 2020
finasteride how to get
Amylot 28 Sep 2020
nexium in canada
Janelot 5 Oct 2020
singulair 117
Kimlot 7 Oct 2020
clopidogrel 75 mg tablet
Evalot 8 Oct 2020
dipyridamole capsules 200mg
Janelot 9 Oct 2020
ampicillin 500mg over the counter
Kimlot 10 Oct 2020
ampicillin 25 g
Evalot 12 Oct 2020
quineprox 10mg
Janelot 14 Oct 2020
where can i buy cymbalta cheap
Kimlot 14 Oct 2020
ampicillin cost australia
Lisalot 19 Oct 2020
order kamagra online australia
Kialot 22 Oct 2020
how to buy cialis
Kimlot 24 Oct 2020
biaxin 500mg
Evalot 24 Oct 2020
suhagra 50 online
Evalot 25 Oct 2020
bactrim pill
Evalot 26 Oct 2020
200 mg lasix
Evalot 29 Oct 2020
metformin 5
Kimlot 1 Nov 2020
how to buy sildenafil online usa
Kimlot 4 Nov 2020
hydroxychloroquine 800mg
Evalot 4 Nov 2020
zofran 8mg coupon
Kimlot 4 Nov 2020
amoxicillin over the counter in australia
Janelot 5 Nov 2020
emsam drug
Kimlot 6 Nov 2020
robaxin 500 mg generic
Evalot 8 Nov 2020
metoclopramide canada
Amylot 11 Nov 2020
generic malegra dxt
Janelot 13 Nov 2020
zofran 75mg
Kimlot 13 Nov 2020
zofran medicine
Kimlot 15 Nov 2020
buy sildenafil online uk
Janelot 17 Nov 2020
buy trental 400mg
Kimlot 18 Nov 2020
purchase yasmin no prescription
Evalot 20 Nov 2020
rumalaya without prescription
Janelot 25 Nov 2020
ceftin for strep throat
Kimlot 25 Nov 2020
trental pill
Evalot 27 Nov 2020
dexamethasone 4 mg tablet
Janelot 28 Nov 2020
levaquin cipro
Janelot 4 Dec 2020
purchase cheap noroxin
Evalot 4 Dec 2020
sildenafil sale in india
Evalot 4 Dec 2020
omnicef for sinus infection
Evalot 6 Dec 2020
where can you buy modafinil
Evalot 8 Dec 2020
trental er
Lisalot 8 Dec 2020
imdur 60 mg
Kimlot 9 Dec 2020
tizanidine buy
Evalot 10 Dec 2020
diovan tablets
Janelot 11 Dec 2020
coreg 3.125 mg
Kimlot 15 Dec 2020
hydroxychloroquine
Amylot 16 Dec 2020
tegretol 200 mg generic
Janelot 16 Dec 2020
stromectol in canada
Evalot 17 Dec 2020
avapro 10 mg
Kimlot 17 Dec 2020
sildenafil 100mg tablets buy online
Kimlot 19 Dec 2020
fluoxetine capsules 10 mg
Evalot 21 Dec 2020
ivermectin
Evalot 23 Dec 2020
ivermectin brand name
Evalot 25 Dec 2020
cost of imitrex generic
Kimlot 26 Dec 2020
where can i buy vardenafil
Janelot 29 Dec 2020
sildenafil otc canada
Janelot 1 Jan 2021
ceftin 200 mg tablet
Janelot 4 Jan 2021
prices of sildenafil
Janelot 6 Jan 2021
buy sildenafil online paypal
Evalot 6 Jan 2021
generic alli pills
Evalot 7 Jan 2021
finpecia without prescription
Janelot 10 Jan 2021
sildenafil 20 coupon
Janelot 12 Jan 2021
ivermectin 0.5
Janelot 12 Jan 2021
ivermectin lice oral
Evalot 12 Jan 2021
retin a cream 0.025
Kimlot 14 Jan 2021
buy lyrica from india
Evalot 16 Jan 2021
buy chloroquine
Evalot 18 Jan 2021
1600 mg amoxicillin
Janelot 23 Jan 2021
cymbalta 20 mg
Kimlot 24 Jan 2021
where to buy acyclovir cream over the counter
Janelot 27 Jan 2021
gabapentin 900 mg capsules
Evalot 28 Jan 2021
where to buy bactrim
Kimlot 30 Jan 2021
ivermectin 2
Janelot 1 Feb 2021
aralen 500
Evalot 3 Feb 2021
prices for 1000 metformin
Kimlot 4 Feb 2021
ceftin cheap
Evalot 6 Feb 2021
buy metformin online nz
Kimlot 8 Feb 2021
bactrim mexico
Janelot 9 Feb 2021
uk pharmacy no prescription
Kimlot 12 Feb 2021
advair diskus cost
Kimlot 14 Feb 2021
gabapentin 1000
Kimlot 15 Feb 2021
plaquenil eye damage
Evalot 15 Feb 2021
orlistat over the counter price
Janelot 16 Feb 2021
metronidazole amoxicillin
Kimlot 17 Feb 2021
pharmacy prices for sildenafil
Janelot 19 Feb 2021
metformin price in canada
Evalot 19 Feb 2021
plaquenil generic
Janelot 19 Feb 2021
zofran pill over the counter
Amylot 21 Feb 2021
retin
Kimlot 23 Feb 2021
canada cialis
Janelot 23 Feb 2021
proscar online uk
Kimlot 23 Feb 2021
where to buy sildenafil without prescription
Evalot 24 Feb 2021
hydrochlorothiazide price canada
Kialot 25 Feb 2021
malegra 50 mg
Kimlot 28 Feb 2021
bupropion 300mg cost
Evalot 28 Feb 2021
generic sildenafil otc
Janelot 4 Mar 2021
sildenafil citrate tablets 100 mg
Evalot 6 Mar 2021
buy sumycin
Kimlot 6 Mar 2021
flagyl generic brand
Janelot 6 Mar 2021
northwest pharmacy canada
Kimlot 7 Mar 2021
canadian pharmacies compare
Kimlot 11 Mar 2021
medrol 8mg tablet price
Kimlot 19 Mar 2021
otc buspar
Evalot 20 Mar 2021
sildenafil women
Evalot 26 Mar 2021
priligy tablets online
Kimlot 26 Mar 2021
atarax liquid
Janelot 28 Mar 2021
order bupropion online
Evalot 1 Apr 2021
average cost cialis
Janelot 7 Apr 2021
clomid purchase
Kimlot 10 Apr 2021
colchicine canada prescription
Janelot 11 Apr 2021
your pharmacy online
Evalot 13 Apr 2021
bupropion 100mg
Evalot 15 Apr 2021
[url=http://viagracap.com/]sildenafil canada buy[/url]
Evalot 15 Apr 2021
[url=http://viagrahere.com/]buy kamagra online uk cheap[/url]
Janelot 18 Apr 2021
[url=http://pharmacyvpro.com/]express scripts com pharmacies[/url]
Kimlot 23 Apr 2021
[url=https://viagramlab.com/]sildenafil cost in india[/url]
Janelot 23 Apr 2021
[url=https://viagrakey.com/]generic sildenafil prescription[/url]
Lisalot 24 Apr 2021
[url=https://osnpharm.com/]buy ivermectin[/url]
Evalot 25 Apr 2021
[url=http://monoviagra.com/]generic sildenafil citrate[/url]
Janelot 27 Apr 2021
[url=https://tntpharm.com/]modafinil pharmacy uk[/url]
Lisalot 27 Apr 2021
[url=https://viagrasi.com/]generic sildenafil 20 mg tablet[/url]
Lisalot 29 Apr 2021
[url=https://arrpharmacy.com/]canadian neighbor pharmacy[/url]
Janelot 2 May 2021
[url=https://buyndrx.com/]medication diflucan price[/url]
Evalot 4 May 2021
[url=http://viagracialistabs.com/]online generic sildenafil[/url]
Kimlot 4 May 2021
[url=https://intelpills.com/]tretinoin prescription online[/url]