
Have you accidentally deleted a file from your PC? Here’s how you can recover files you’ve deleted on Windows 11 and 10.
Have you ever deleted a file you didn’t think you’d need, only to find yourself looking for it weeks later? You’re not alone, and it’s no fun realizing you could have saved yourself a lot of trouble if you had been more careful. Thankfully, when mistakes like this happen in Windows 11, you can try and recover the files you deleted accidentally or absent-mindedly.
With Windows 10 and 11, you can find lost files several ways. The easiest method is simply using your Recycle Bin, as most deleted files tend to go there before being deleted permanently. However, if your files aren’t in the Recycle Bin anymore, you can still go deeper and recover them with specialized software. This option might not work all the time, but it can help tremendously. And if you had the foresight to set up a specific Windows 11 feature, you can use backups to regain your files. We’re going to take a look at all of these options.
How to recover files from the Recycle Bin
By default, all files except for abnormally large ones transfer to the Recycle Bin when you delete them and generally stay there for a long time. Features like Storage Sense on Windows 11 delete files from the Recycle Bin after a while, but more recent files should remain. To recover deleted files from the Recycle Bin, simply follow these steps:
- On your desktop, double-click on the Recycle Bin. If you can’t find it, open the Start menu, type Recycle Bin into the search bar, and click on the result that pops up.

- Search for the file you want to recover. Note the location listed next to it.
- Select the file or files you want to ‘un-delete.’ Right click on it, and then pick Restore from the drop-down menu.
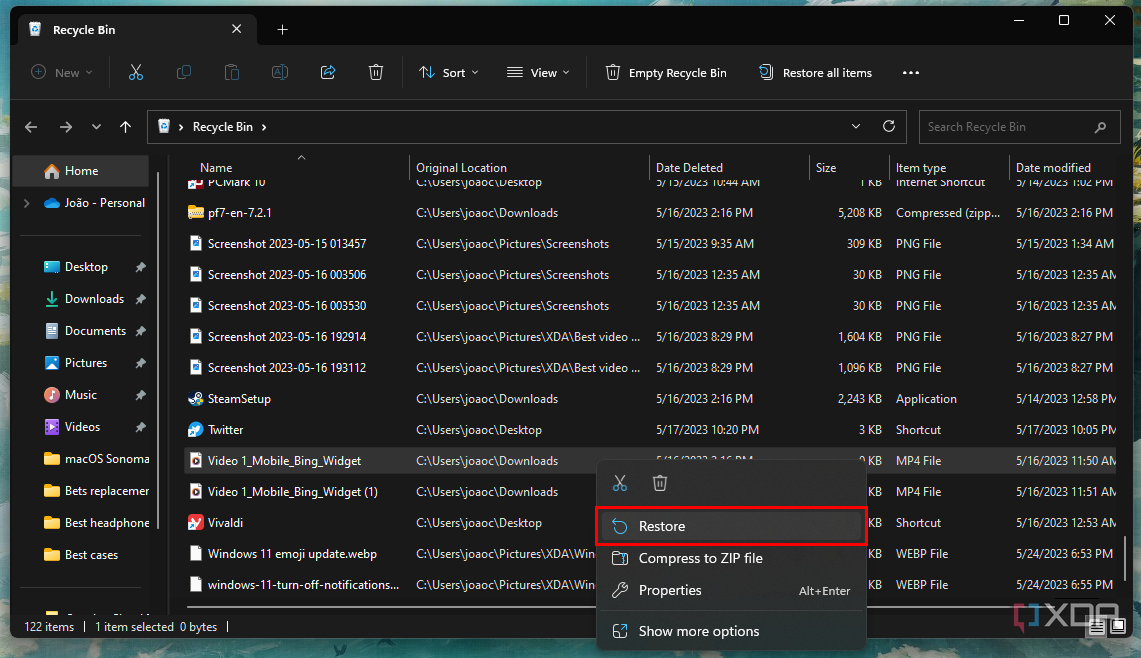
- Alternatively, if you want to restore all the files in your Recycle Bin, click on Restore all items at the top of the window.
The files will now reappear in the folder where they were originally stored, and you can use them as normal.
Restoring files from the Recycle Bin is a very simple procedure, but admittedly, most people probably already know about it. So, what can you do if the file you want isn’t in the Recycle Bin? Then the restoration process gets complicated, but there’s still hope.
Recover files using Windows File Recovery
Microsoft recovery tool to the rescue
Plenty of programs can help you recover deleted files from the depths of your hard drive, but most require a fee to use. Usually, the “free” recovery apps are only trials with limited functionality. However, a few years ago, Microsoft stepped up with its own solution, Windows File Recovery. You have to install this app before you can use it, but Windows File Recovery helps you recover deleted files that might seem like they’re gone forever.
While Windows File Recovery is extremely useful, this tool is entirely based in command line interface (CLI), so it requires a bit of coding knowledge to use. However, we’re here to help with that.
- Open the Microsoft Store.
- Search for Windows File Recovery and select the first choice that pops up. The program should be labeled as an Utilities & tools app published by the Microsoft Corporation.
- Click on the Get button to download Windows File Recovery.
- After the program is finished installing, launch the app from the Start menu.
- Click Yes when the User Account Control prompt appears.
- Windows File Recovery should pop up in a Command Prompt (CMD) window.
- The CMD window will explain Windows File Recovery‘s instructions. The basic command should look like this:winfr source-drive: destination-folder [/mode] [/switches]
- source-drive represents the drive where the file was originally stored (insert relevant letter, e.g., C:)
- destination-folder indicates the folder path where the files will be stored after restoration (e.g., D:). In order to prevent file errors or corruption, the destination folder can’t be part of the same drive as the source drive.
- mode can either be regular or extensive. Regular is adequate for non-corrupted NTFS drives and is more useful for recovering recent files. Extensive mode works with all file systems and performs a deeper search.
- switches allows you to narrow search parameters, particularly with the n switch. You can use switches to specify a folder path, extension, or even file name if you don’t want to recover every possible file that’s ever been deleted.
- Let’s say you want to recover a file from your Documents library. For this example, enter the command as follows to run a scan in regular mode:winfr C: D:\Recovery /regular /n users\joaoc\Documents\
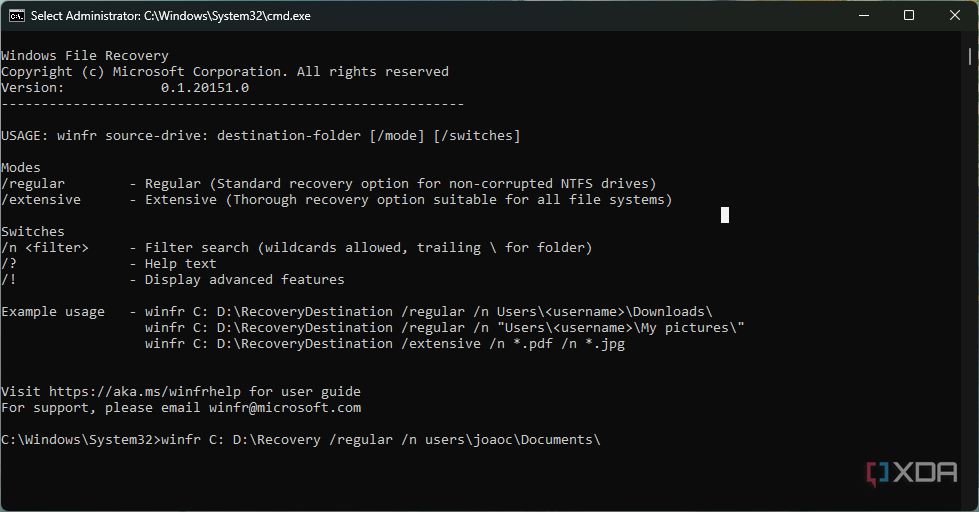 This command will attempt to recover all the files deleted from the Documents library for the current user (joaoc).
- You can also use wildcards by adding an *. For example, if you know you deleted a Word document but don’t exactly remember its name, you can enter users\joaoc\Documents\*.docx at the end of the command.
- After entering a command, you’ll be asked to confirm the search conditions. Press Y on your keyboard to confirm.
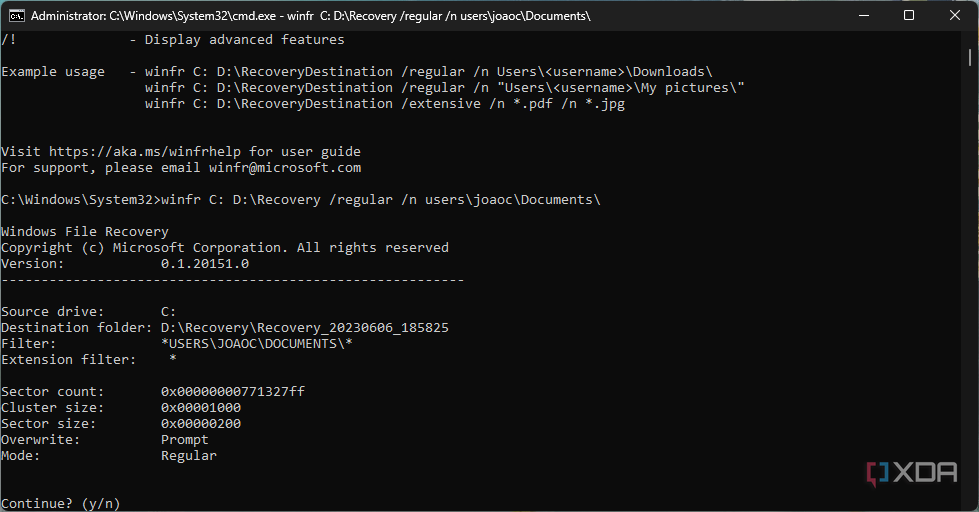
- If multiple files have the same name, you’ll be prompted to choose whether to keep both or only one. Press the O key to overwrite the files, S to skip them, A to overwrite subsequent duplicate files, N to never overwrite, K to keep all files, and B to keep all subsequent duplicate files.
- The file or files will be recovered if possible. You can press Y again to open the destination folder and see your recovered files.

- If searching in regular mode didn’t work, repeat the process but replace regular with extensive in the command above to perform a deeper search.
Windows File Recovery should help you retrieve the files you lost. You can tweak the program’s parameters in the command above to search in different drives or folders or to restore the files to different locations. Please note that your specific command line will differ from the example we provided, you’ll of course need to substitute your own unique information.
If you still can’t find what you’re looking for, either your deleted files are beyond saving, or you need special paid software to fish them out of the digital void. Unfortunately, if it’s the latter, expect to pay a pretty penny.
Back up files with File History
If you don’t already have this set up, you can take steps to avoid file loss in the future
You can usually recover lost files by just retrieving them from a backup. Depending on how often you actually back up files, your files might be a little out of date or were never backed up at all. Windows 11 has a built-in feature, File History, that automatically backs up files whenever they are changed, minimizing these risk factors. If you are lucky enough to have set it up, you can retrieve deleted files there.
Your first step should be to make sure that File History is on… and set it up if not.
- Connect an external hard drive to your computer. Wait for the PC to recognize it. You might have to format the hard drive.
- Click the Start button.
- Type File History into the search bar, and click on the first entry that appears.
- A new window will pop up. If File History is off, the words “File History is off” should appear near the top.
- Make sure File History is programed to upload your documents to the attached hard drive.
- Press the Turn on button to turn on File History.
Once you have set up File History, you can tweak the program to exclude certain folders, adjust how often it will save backups, and how long it should keep the backups. Once File History saves backups of your files, you can use the program to restore those previous versions if you ever accidentally delete the main copy from your PC. When you are restoring files using this method, follow the steps below:
- Click the Start button.
- Type Settings into the search bar, then open the first option.
- Type File History into the Settings window’s search bar and select Restore your files with File History.
- Search for the document you want to bring back. You might have to go digging through a few folders.
- Select the file or files you want, then hit the green arrow button at the bottom of the window.
Once the process is complete, your files should be restored. However, please note that if you forgot to activate File History before you deleted the documents, this method won’t magically bring them back.