
Learn how to check Windows 11 laptop battery health with our easy-to-follow guide
Checking Windows 11 laptop battery health can be important if you own a portable PC that’s running Microsoft’s latest OS.
Battery life is obviously a big deal, whether you’re working on one of the best business laptops or enjoying a marathon Starfield session on one of the best gaming laptops currently on the market.
Thankfully, looking into the state of your Windows 11 laptop battery health is fairly straightforward, and can be done in pretty much no time. All that’s really required is running a quick line of code through Windows’ Command Prompt, then saving the resulting battery report as an HTML file you can then open in your browser of choice.
Once said report is in front of you, it’s easy to instantly analyze everything including the type of battery installed in your laptop, recent battery usage, battery usage history, battery capacity history and battery life estimates. And yes, that’s definitely the most times we’ve ever typed ‘battery’ in a single sentence here at Tom’s Guide.
The Razr is BACK! Inside the Surprise Foldable Phone of the Year
While these figures may appear to be a little daunting at first, they’re useful for letting you know if there’s anything untoward going on with your laptop’s battery. If you find that historical usage is showing that your battery is consistently losing juice, you may need to replace your laptop battery.
For now, though, let’s not worry about the worst case scenario. Instead, we’ll focus on running you through the steps of how to check the battery health of your Windows 11 laptop, with our quick and easy to follow guide.
How to check Windows 11 laptop battery health
- Open the Start menu, then search for Command Prompt
- Run Command Prompt in administrator mode
- Type powercfg /batteryreport /output “C:\battery_report.html” and press enter
- Navigate to the “C:\battery_report.html” file on your C drive
- Click the html link to view the battery report
Read on to see full illustrated instructions for each step.
1. Open the Start menu, then search for Command Prompt
Press the Windows button on your laptop’s keyboard, then in the search tab type ‘Command Prompt’.
2. Run Command Prompt in administrator mode
After the ‘Best match’ menu pops up, right click on the Command Prompt app and click ‘Run as administrator’.
3. Type powercfg /batteryreport /output “C:\battery_report.html” and press enter
Once you’re in Command Prompt, type this line of code exactly as follows — powercfg /batteryreport /output “C:\battery_report.html” — and press enter. This will generate a battery report that immediately saves to your C drive.
4. Navigate to the “C:\battery_report.html” file on your C drive
To find the battery report you’ve just generated, open your File Explorer from the Windows 11 taskbar, then click ‘This PC’. From here you want to navigate to the ‘Devices and drives’ section. Once you have, open your C drive, where your new ‘battery_report.html’ file should be sitting at the bottom of the folder.
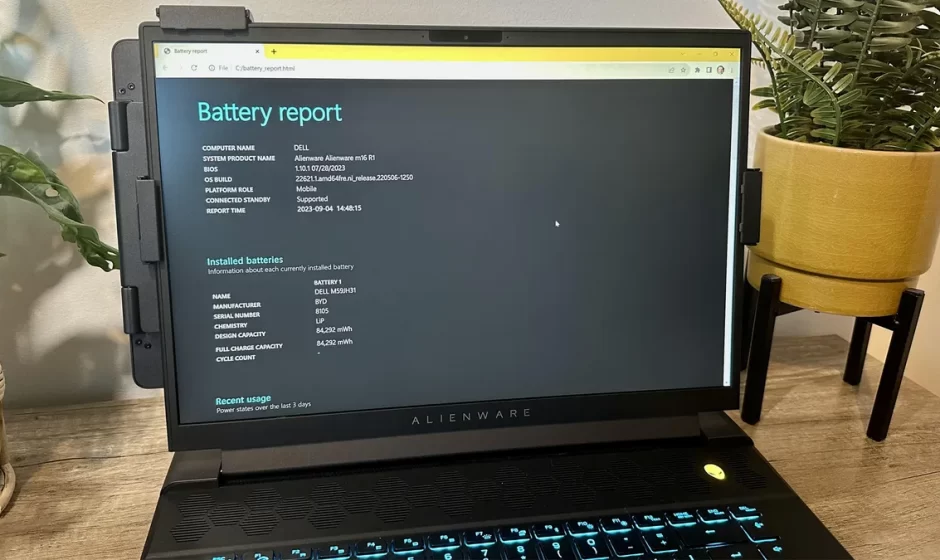
5. Click the html link to view the battery report
After clicking this html link, your battery report will open in your default browser. From here you can check everything from ‘Usage history’, ‘Battery capacity history’, to ‘Battery life estimates’.
And there you have it. You now know how to quickly check the battery health of your Windows 11 laptop. This obviously isn’t a process you’re going to have to regularly run through if your laptop is relatively new, but for older models, it’s probably worth checking on your battery health every few months.